
Introduction
Welcome to the Narrativa® Navigator user guide! Narrativa was founded in 2015 and has since become an internationally recognized B2B agentic AI company. We believe that people and artificial intelligence are better together and through Narrativa® Navigator, teams of all types and sizes are empowered to build and deploy smart composition, business intelligence reporting, and process optimization content solutions for internal and external audiences alike.

In this user guide, we will share with you the step-by-step process for utilizing data and text to create transformative content for your business and workforce.
If you have been granted trial access to Narrativa® Navigator, a countdown indicator toward the bottom left will inform you how many days you have remaining.
Quick Start Guide
In the simplest terms, Narrativa® Navigator allows you to create automations that transform data into distinct narratives. Narratives are articles, reports, or any other type of useful content. Once you receive your credentials and log in, you will see a screen with four tabs: Dashboard, Data, AI Agent Recipes, and Projects.
Throughout this quick start guide, we will use a familiar cooking analogy to help you better understand how Narrativa® Navigator works.
| Dashboard |
The first thing you will see when you access the platform is the Dashboard. This is the control panel that will allow you to access all your content, or rather, all the “meals” you have served. For new users, this panel is empty until the first content project is developed.
|
| Data |
Assume you’re making dinner at home; DATA are the raw, measured ingredients. (And like grocery shopping for the right items, data may first need to be gathered and organized.)
|
| AI Agent Recipes |
In keeping with our analogy, an AI AGENT dictates how to manipulate, or prepare, the ingredients.
|
| Projects |
Building a PROJECT is similar to cooking the ingredients per the AI Agent specifications and plating the meal.
|
Do you work alone or in a team?
In Narrativa® Navigator, each user has a unique and non-transferable profile associated with an email address. This means that everything you do—create a dataset, train an AI agent, or work on a project—is stored exclusively in your account and is not automatically shared with others.

This individual way of working guarantees security, privacy, and total control over your content. But what happens when you need to collaborate?
Collaborate in groups: Work as part of a team without losing autonomy
Several individual accounts can be associated under the same group. This feature allows different profiles to share their Datasets, AI Agents, and Projects with each other without losing their personal access. In other words, if you are part of a technical team, a development environment, or simply need to share your work with colleagues, the group is the simplest and most efficient way to do so. Each member retains their account, but the elements shared within the group will be accessible to all participants. Identifiers help you easily know what belongs to the group and what is yours alone.
Content Automation Workflows
Narrativa® Navigator offers the capability to automate content generation through artificial intelligence. This is accomplished by creating content automation workflows that effectively convert data sets into content narratives. By employing these workflows, users may save valuable time and generate a greater volume of content, all without experiencing delays or the need for additional manual labor.
How do the Automation Workflows work?
First, a dataset is added into the system, which can be uploaded or synced to the platform. It’s crucial to note that each row within the dataset corresponds to a distinct content narrative. Therefore, it is essential to ensure that all the necessary data required to generate a content narrative is included within each row of the dataset.
The system analyzes the dataset row by row, extracting the relevant information and utilizing it to generate content narratives. Each row serves as an input for the content generation process, allowing the system to create unique and tailored narratives based on the provided data.
The data set is then augmented using AI Agent Recipes. Once successfully processed, AI Agent Recipes are used within a Project to build out full narratives.
Lastly, these narratives are seamlessly generated and placed into the content management system (CMS) to be reviewed and/or published. In a nutshell, data points populate in specific predefined places throughout the narrative and read intelligibly because of the context that was created around them.
What are content narratives?
Narrativa® Navigator is capable of many things, but these are a few of the most common narratives that you are able to create:
- Long/short format content articles
- Reporting
- White papers
- Social media posts
- Marketing content
Dashboard
Dashboard allows users to get a quick visual overview of when and how many narratives have been generated in your account. This is the first page you will see when you access the platform. You may view the Dashboard at any time by clicking the Dashboard icon in the navigation bar.

Components of the Dashboard
There are five components to the dashboard:
- The Total Narratives Card simply displays the aggregate number of narratives that have been generated during the period in question.
- The Time Selector allows you to cycle through periods of time for which you may view your generated narrative totals.
- The Daily Narratives Graph is a bar chart that visually communicates your daily narrative totals during the period in question.
- The Daily Projects Graph is a bar chart that visually communicates your daily narrative totals during the period in question, further segmented into your top Projects.
- Lastly, you can export the information on the dashboard to a CSV file.


Data Sources
The first step in the process to create a content automation workflow is to upload or sync a data set in CSV format to the platform so the data contained within can be used properly in content narratives further down the line.
Uploading Data Files
There are three methods available for uploading a data set.

Upload CSV File: Select to upload a CSV file located in your computer.
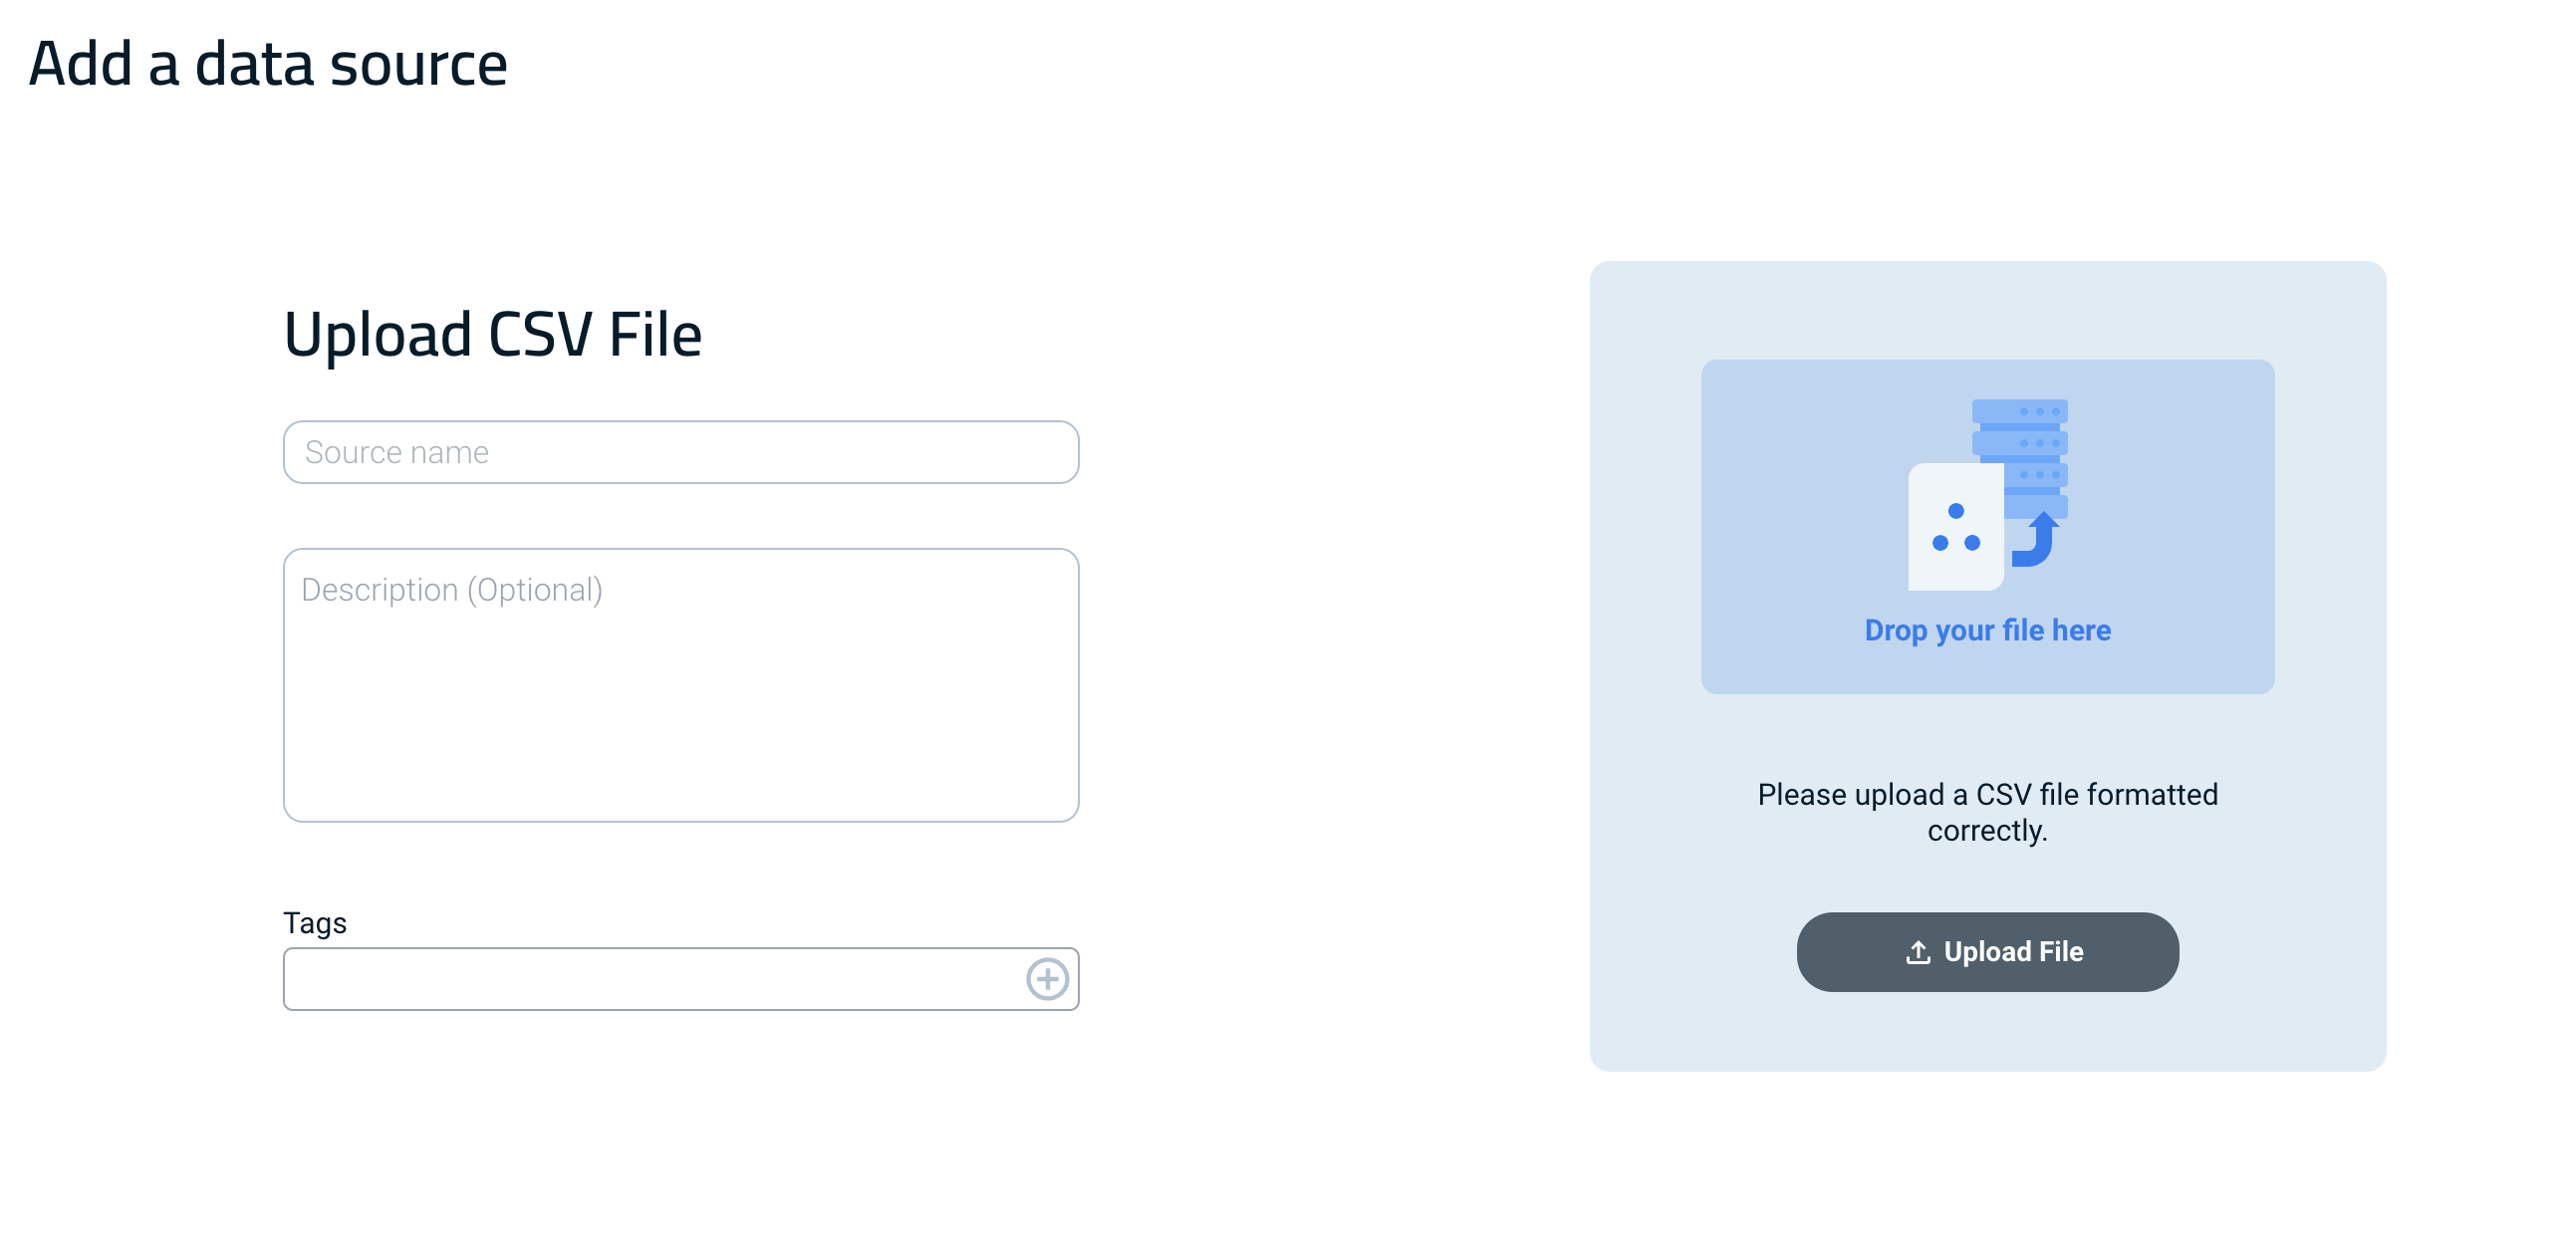
When choosing this method, you need to provide a desired data set name, an optional brief description, and any relevant tags to facilitate easier data source retrieval.
Important: Although the description field is optional, providing one can offer the AI additional context and thus, outcomes may be more in line with your expectations.
To upload the file, you can either drag and drop it into the designated area or click on “Upload File” and manually select the file to import. Once the file is successfully loaded, the “CSV delimiter” option will be activated.

The data will be automatically imported upon file upload, as well as when new data are added to the data set.
Upload a Cloud File: With this method, you need to specify the data set name, description, and tags. Additionally, you must provide the URL to the CSV file to be uploaded and imported. The data will be periodically updated based on the chosen schedule.
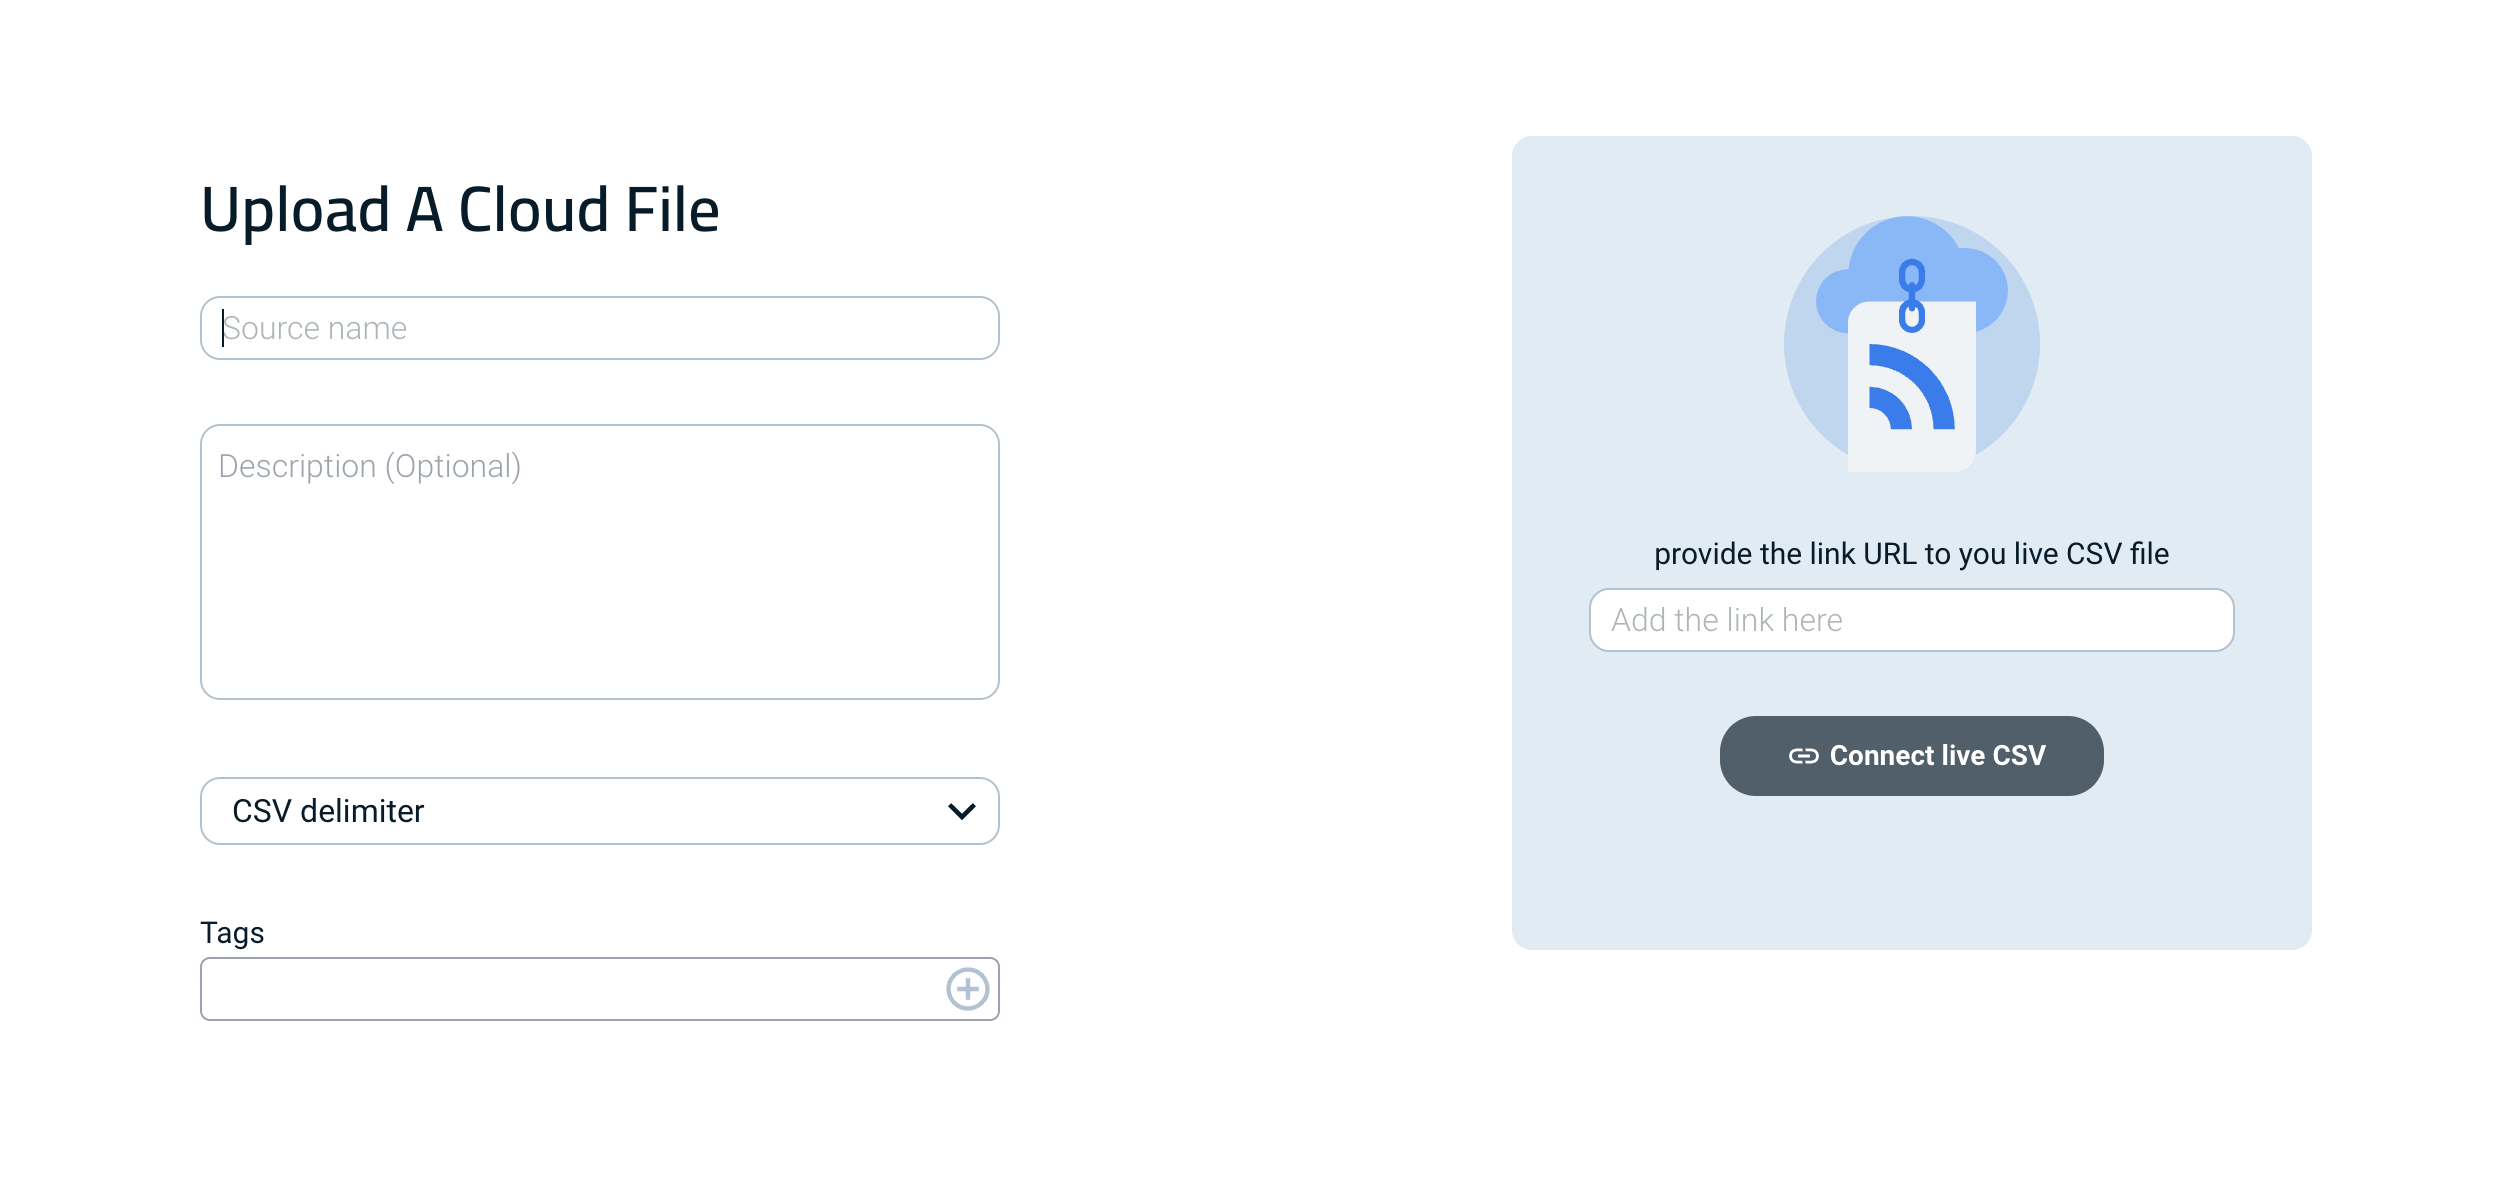
Important: The CSV file must be encoded using UTF-8.
Connect an RSS feed: With this option, you can automatically synchronize updates with scheduled imports via RSS. When connecting, you must also specify the name of the dataset, the description, and the tags, along with the URL of the RSS feed you want to connect. The transformation performed by the platform will be the same as in the previous cases: it will create a table with your data. The data will be updated periodically according to the chosen schedule, as long as the RSS feed also does so.

Data Selection and Configuration
Once the data have been uploaded, you can proceed to the next step, which involves selecting the desired columns to import for your data source. At the top left corner, there is an option to select all columns with a single click.
After selecting the columns, you will reach the Data configuration screen.
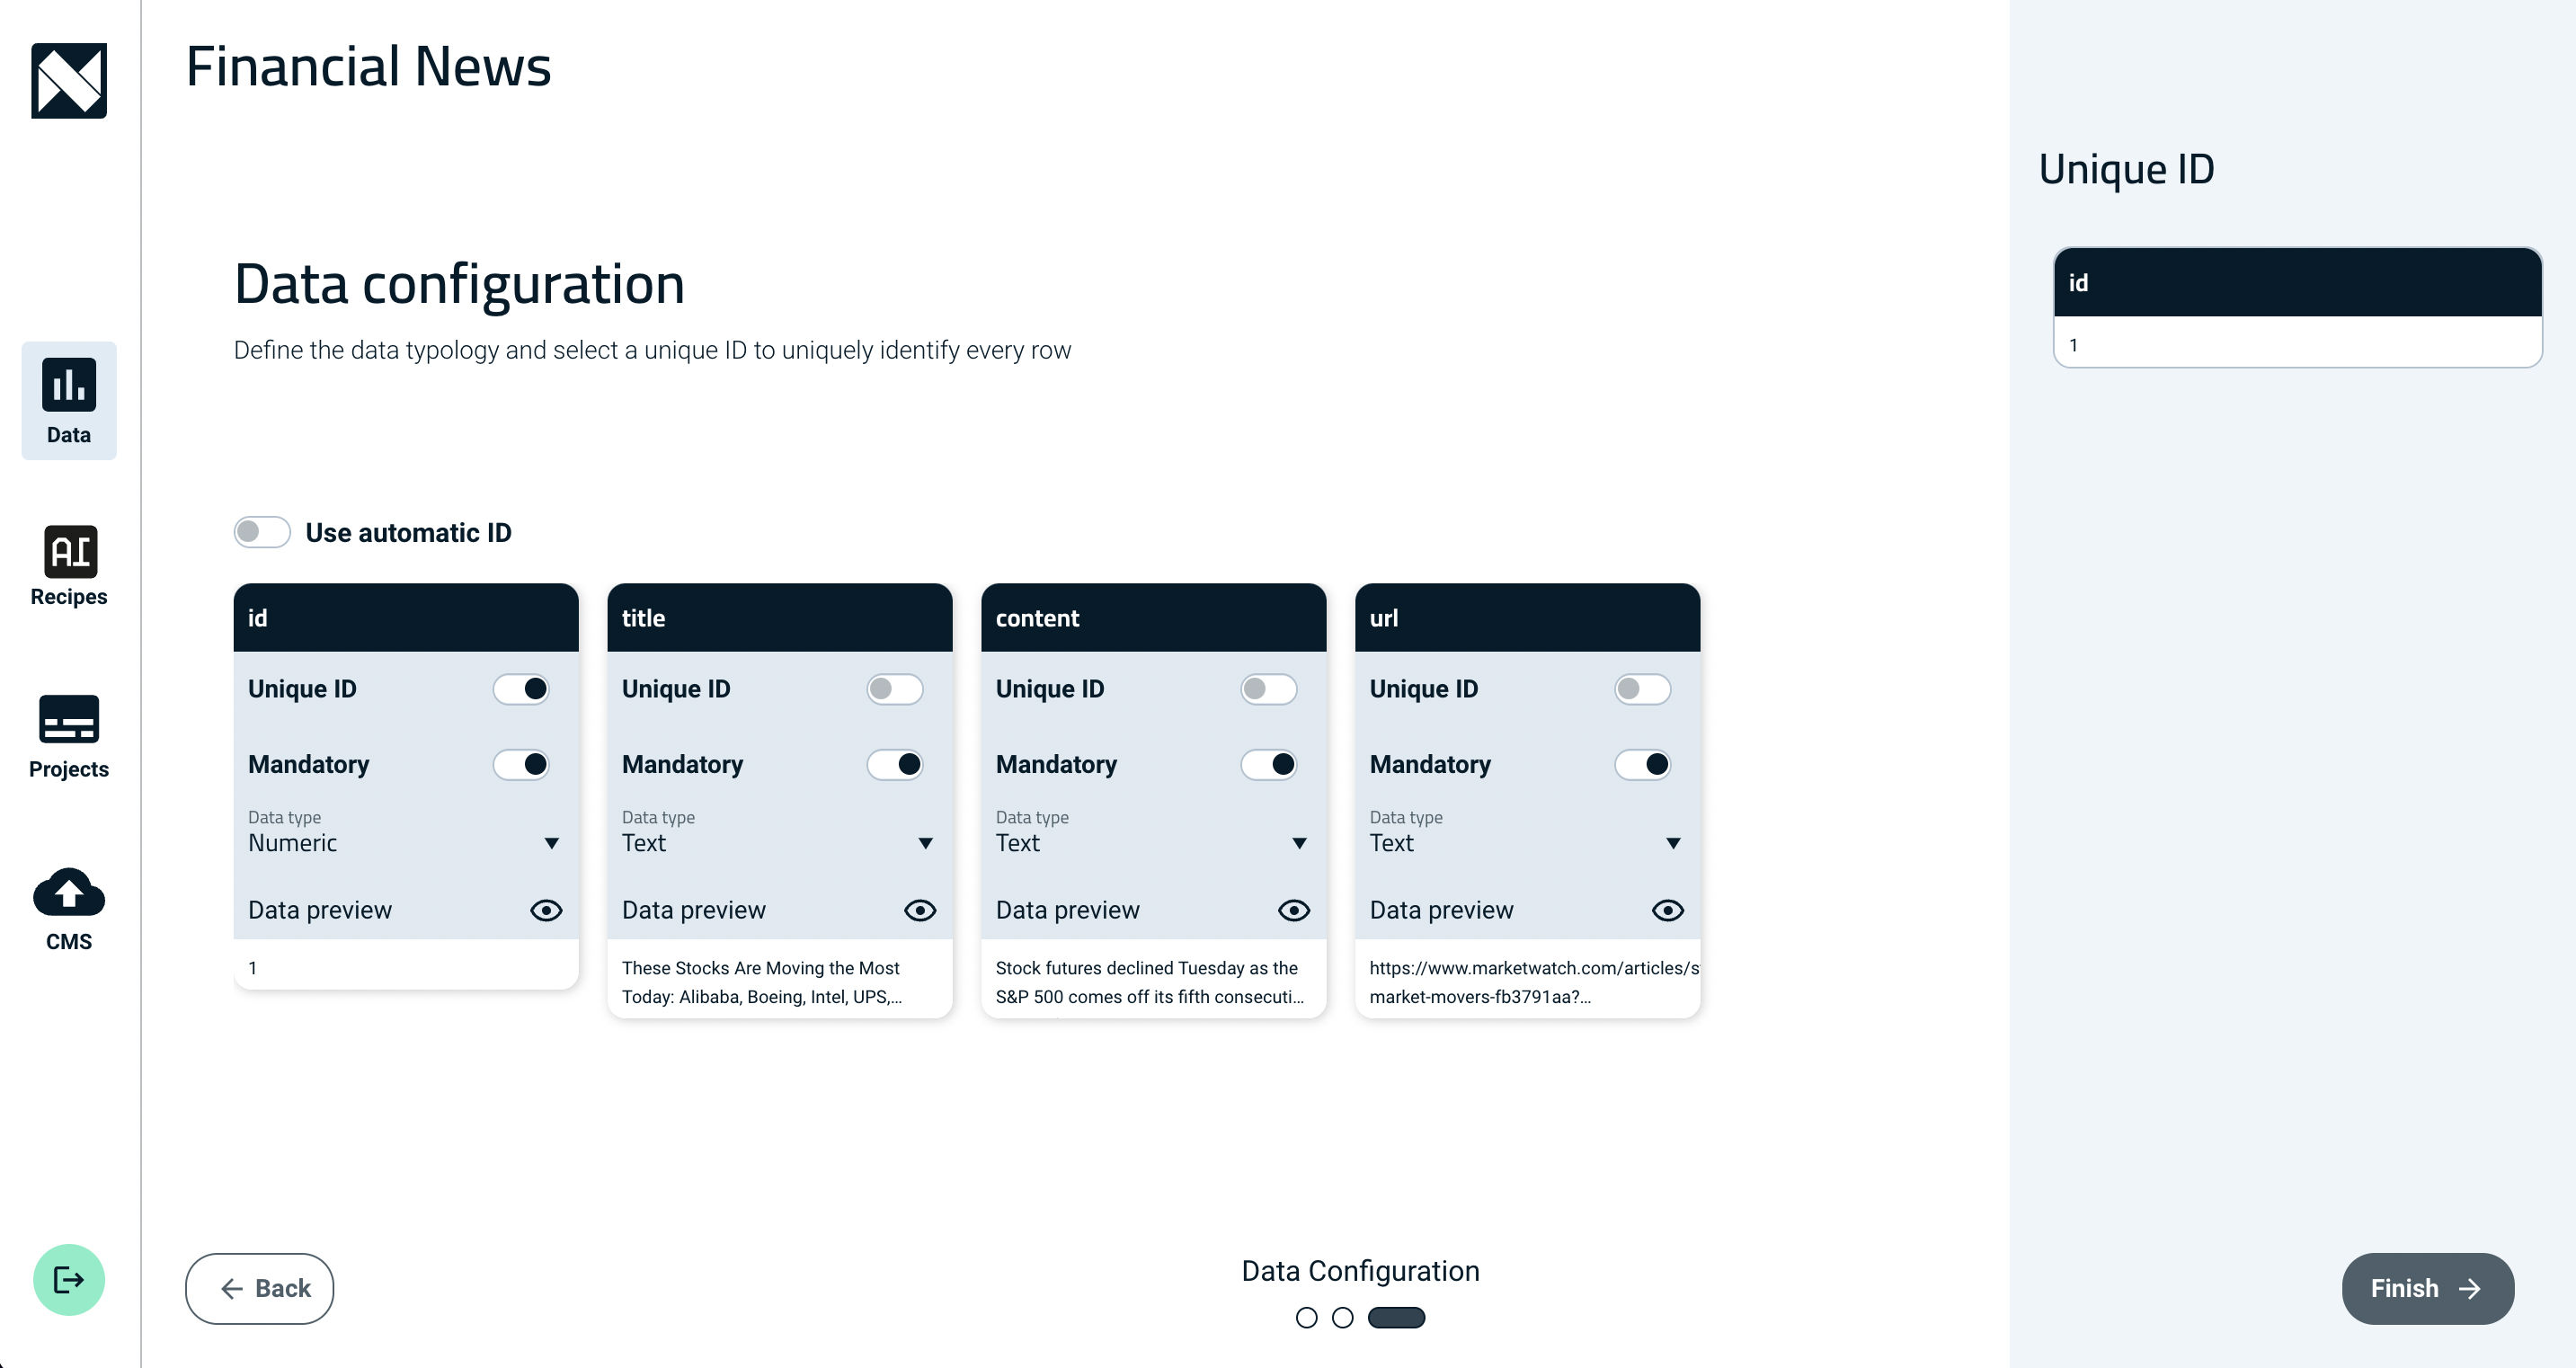
Unique ID
The platform needs each row in a data set to have a unique identifier to prevent duplicate data. You can choose a single column as the unique identifier, or you can select multiple columns and combine their values to create a unique identifier for each row. This ensures that data points are distinct and avoids any repetition.
Tip: If available, choose a column that already contains unique values as the identifier. If that’s not possible, combine relevant columns to create a composite unique identifier. Remember, unique is the key word here, so choose an identifier that will never be repeated.
Mandatory
The mandatory slider will ensure that the data in the respective columns contain at least some value, preventing gaps in the data and potential errors within the final narratives.
Data type
Please also select the appropriate data type for each column in the data set. You can choose from boolean, text, numeric, date, time, and datetime formats. Having the correct format is crucial for proper data processing.
Important: Here are the data type specifications (the ISO format):
- Date: The format should be YYYY-MM-DD, where “Y” represents the year, “M” represents the month, and “D” represents the day.
- Datetime: The format should be YYYY-MM-DD hh:mm:ss, where “Y” represents the year, “M” represents the month, “D” represents the day, “h” represents the hour, “m” represents the minute, and “s” represents the second.
- Time: The format should be hh:mm:ss, where “h” represents the hour, “m” represents the minute, and “s” represents the second.
- Number: Numeric values should follow the format 1,234.56.
- Boolean: Indicates one of two possible values, such as true or false.
- Markup: The format should be in markup language, such as HTML.
Once you have chosen the appropriate data types for each column, you can proceed and click on the “Finish” button. This will generate a data set for use in the platform with the specified formatting.

Additionally, if you have uploaded a live data source, you will encounter the Cloud File Import Scheduling screen. This screen allows you to select the intervals at which the system will check for updates in the original live source.
Note the difference between the live data set and static one is that a different symbol is shown like this:

Cloud File Import Scheduling
The Cloud Files will undergo regular updates based on the selected scheduling options.
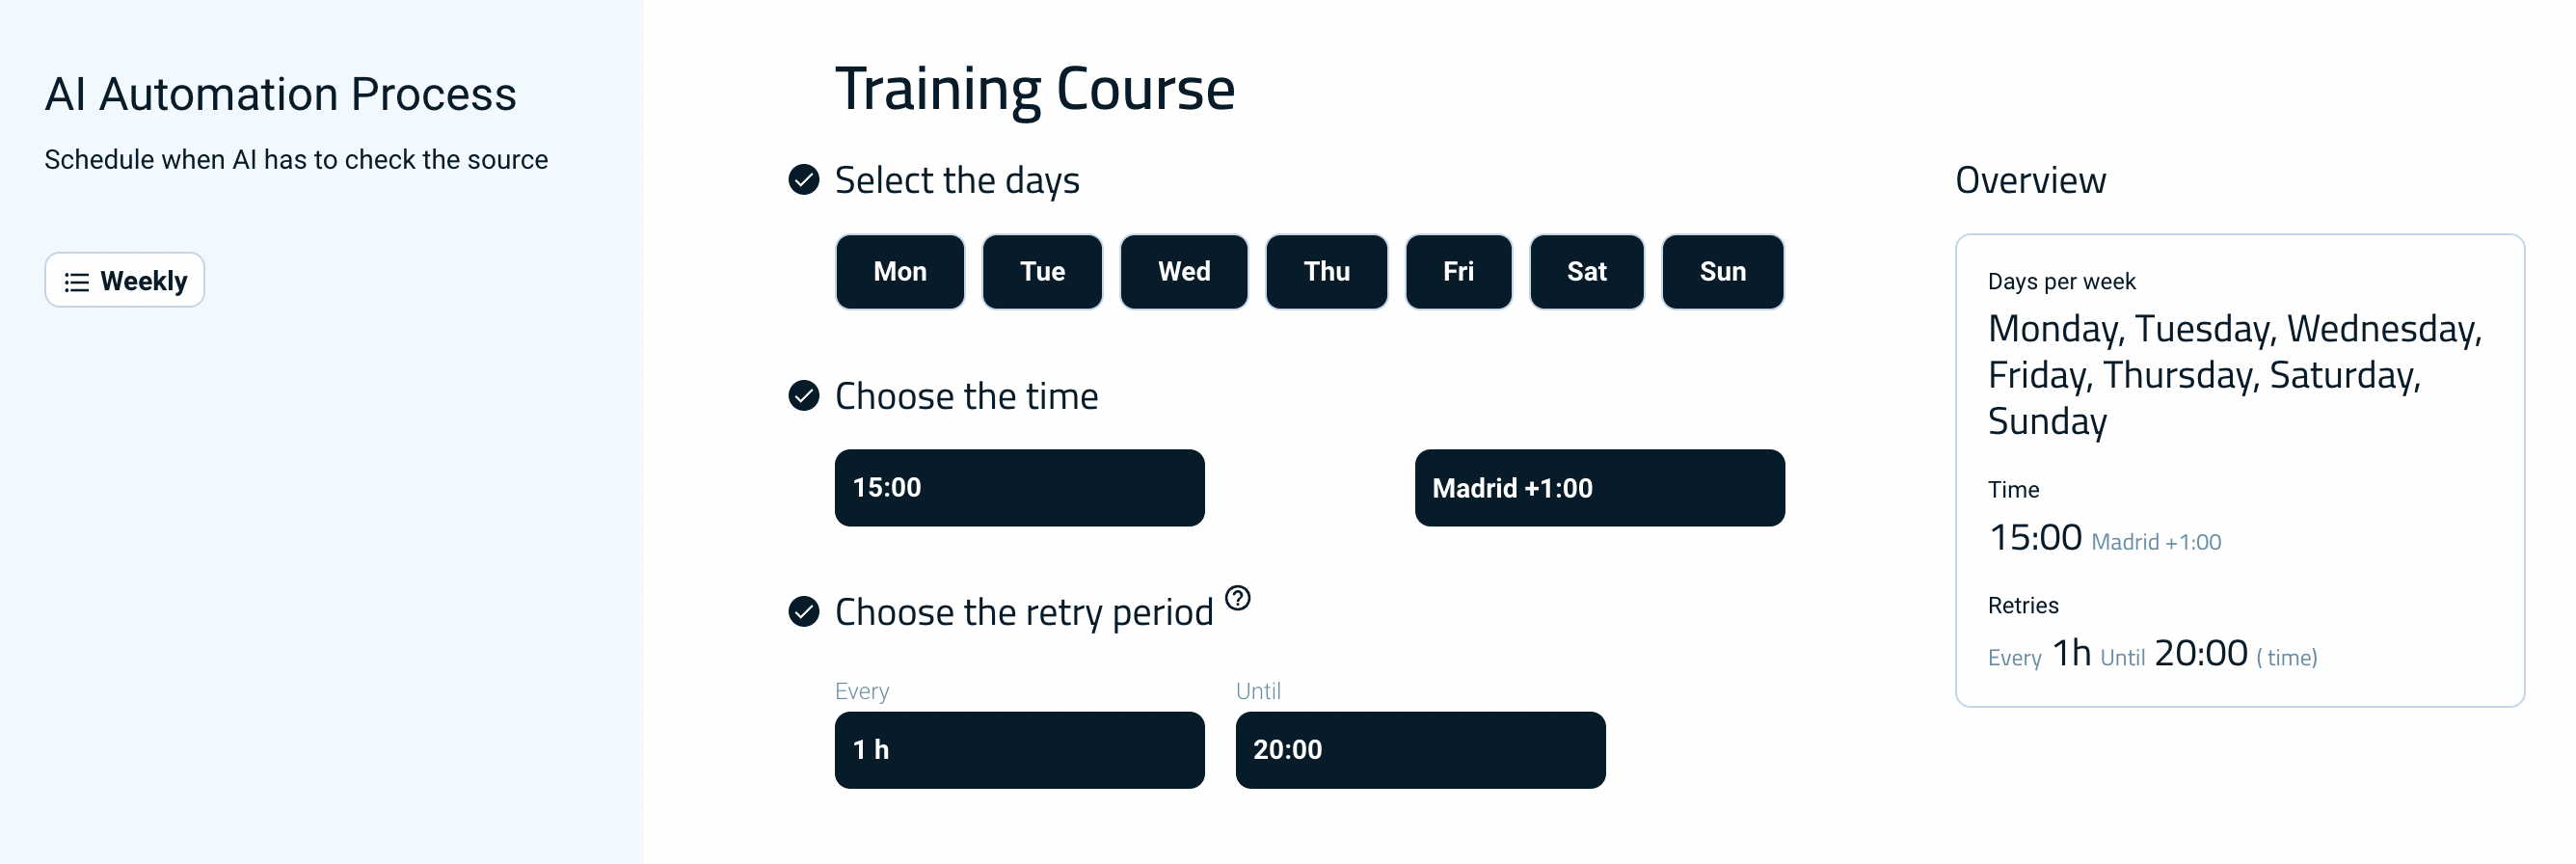
To instruct the platform to periodically retrieve new data from the cloud file, you need to specify the days of the week, the desired time, and the applicable time zone.
Additionally, you can select the retry period and the number of attempts the platform should make to retrieve data from the Cloud file. This allows the platform to make multiple attempts in case the file is temporarily unavailable.
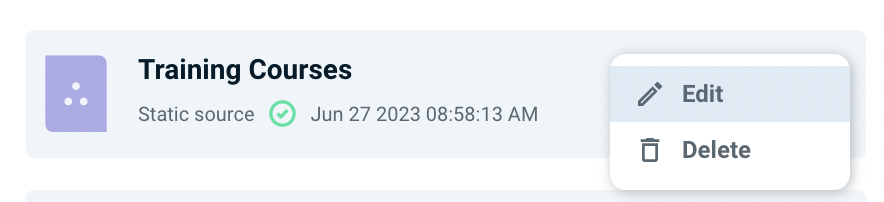
Editing Data Sources
After creating a data set, you have the option to modify the information contained within it. To do so, you can click on the kebab menu icon (i.e. the three vertical dots) located on the right side of the data set card and select the “Edit” option. Upon selecting this option, a new screen will be displayed, providing you with the ability to make edits to all of the previously provided information.
In addition to editing the existing data, this screen also allows you to perform other actions.
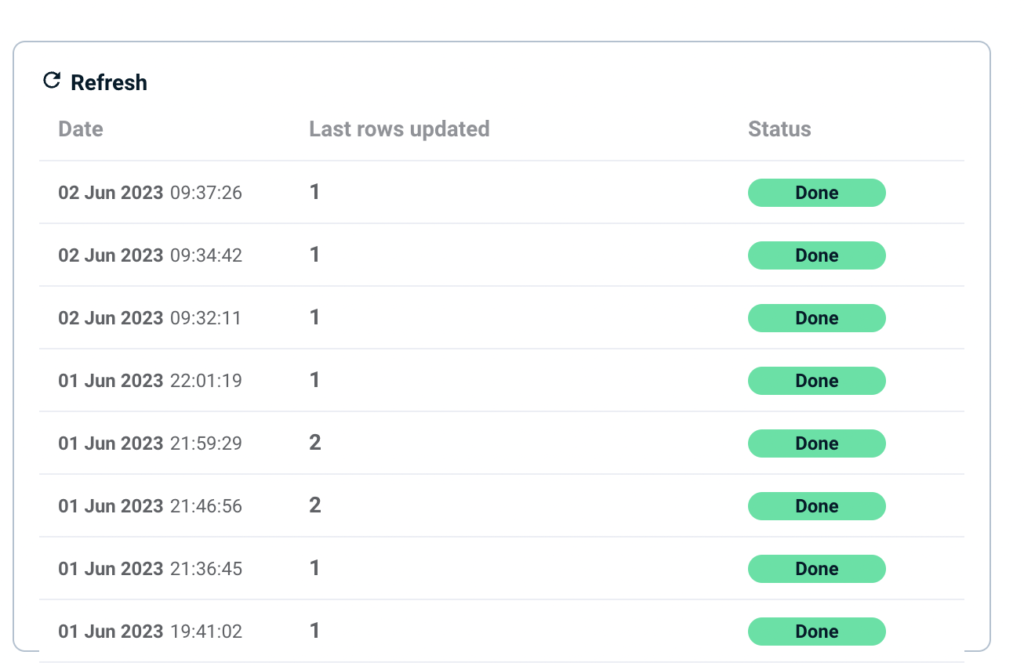
You can upload new data to the data source by adding a new data set file.

A historical record of the previous uploads is also available. Simply click on the number (last rows updated) of the respective entry to access it.
If your data set is live, you only need to add new rows to the CSV Live file and the system will update the data set according to the given update frequency.
Important: At minimum, the data set file that you upload to update your data source must contain all of the original columns and be identical in name. However, additional new columns may be added to the data set file for seamless integration.
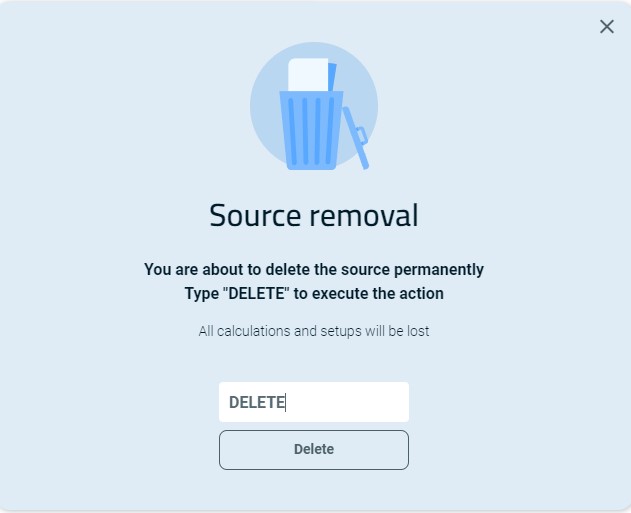
In addition to editing, there is the option to delete a data set.
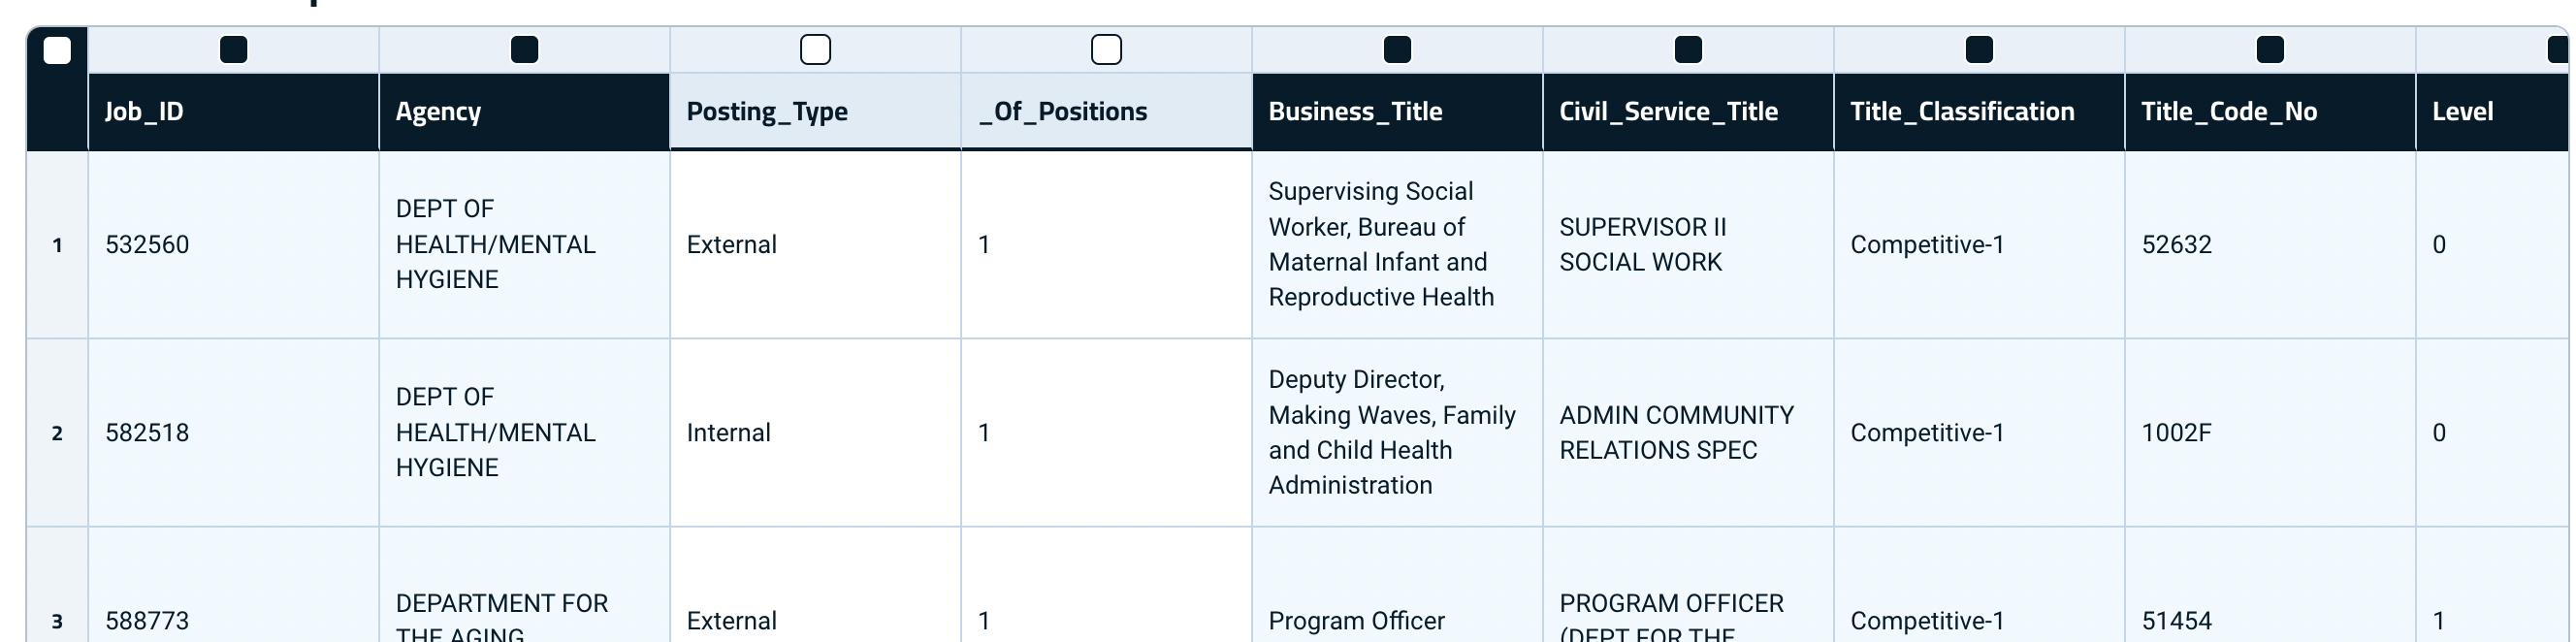
Deleting Rows from Data Sources
Deleting rows won’t impact any previously generated narratives corresponding to them.
To remove individual rows, open the card for your Data Source. Next, hover over the row number to reveal the trash icon and click it.

You may also delete multiple rows concurrently. Click the lower check mark box in the upper left corner next to the down arrow (indicating row selection).

Click the row number to select or deselect the rows to be deleted.

Once your selections are finalized, click the delete selected rows button.

You may also delete all rows from the Data Source by clicking the delete all rows button.

AI Agent Recipes
AI Agent Recipes offer a powerful capability to apply various AI models, mathematical operations, and formatting functions to the data within a dataset. With AI Agent Recipes, you can enhance and transform your data in a multitude of ways, leveraging the potential of artificial intelligence.
AI Agent Recipes Creation
The process of creating an AI Agent Recipes involves a series of steps. To begin, you need to access the AI Agent Recipes page and locate the plus icon located at the top right corner of the page. Clicking on this icon will initiate the creation process.
Next, you will be prompted to select a data source that you have previously created. This data source will serve as the basis for generating the AI Agent Recipes.
AI and Other Functions
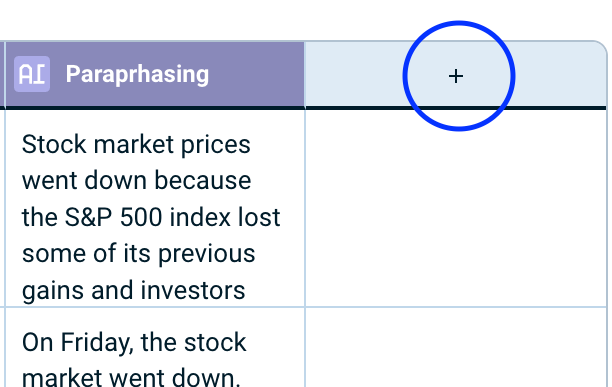
Once you have opened the newly created AI Agent Recipes, you have the ability to create additional columns. This can be done by applying AI models or other functions to the existing data within the original columns of the data set.
Important: Note that when new data are uploaded, the platform will automatically process the AI Agent Recipes in the background. This processing includes calculating the values for the new columns generated by the AI Agent. If an AI Agent fails for whatever reason, the system will periodically retry to complete it.
Important: Furthermore, it is crucial to keep in mind that all AI Agent columns are designated as mandatory. This means that if a column’s value is empty and the corresponding data are used in a Project, the narrative associated with that particular data row will not be generated.
To create a new column, simply click on the plus icon located in the header of the last column. This action allows you to continue expanding the functionality and scope of your AI Agent.
When creating a new column, it is necessary to assign both a name and a description. The name provides a unique identifier for the column and the description, on the other hand, provides a clear and concise explanation of the purpose or content of the column.
Important: Although the description field is optional, providing one can offer the AI additional context and thus, outcomes may be more in line with your expectations.
Important: An AI Agent may be set as mandatory. When enabled, a narrative is designed not to generate on purpose as a failsafe when the AI Agent is empty or contains an error.
AI Agents
AI models are versatile and can be employed in diverse ways to create and augment data, facilitating the generation of content with a high degree of automation. It is worth noting that AI models possess multilingual capabilities and can deliver results based on the language provided, either from the data set or the input prompt. Some of the present AI models include:
AI Automatic Writing
AI Automatic Writing composes text per a prompt using agentic AI (In this case, agentic AI is capable of “ideating” text through deep learning techniques to understand and capture the underlying structure and characteristics of data.)
To use, you need to provide an initial prompt. The model then uses its learned knowledge to generate new content that is relevant and coherent based on the given input. To maximize effectiveness, it is essential to provide clear and specific prompts.
Important: While agentic AI models offer exciting possibilities, it’s important to note that they are probabilistic in nature and rely on the patterns and examples they’ve learned. Therefore, the generated output may not always be perfect or error-free. Careful evaluation and refinement of the output might be necessary to ensure the desired quality and accuracy of the generated content. That is to say, it is best practice to review narratives prior to their distribution.

With this AI model, use the input field to enter the prompt or desired instruction. Additionally, you have the option to incorporate data from specific columns by simply typing the “#” key or selecting from the data dropdown menu.

This feature allows you to leverage the structured data available in your data set to enhance the generative capabilities of the AI model. By referencing the desired column, you can provide additional context or specific information to guide the model’s output generation.
Tip: If you are unsure about how to write a prompt that provides you what you need, see this article about how to write effective prompts.
Other AI Commands
Additional artificial intelligence models available in Narrativa® Navigator:
|
|
 Translation:
 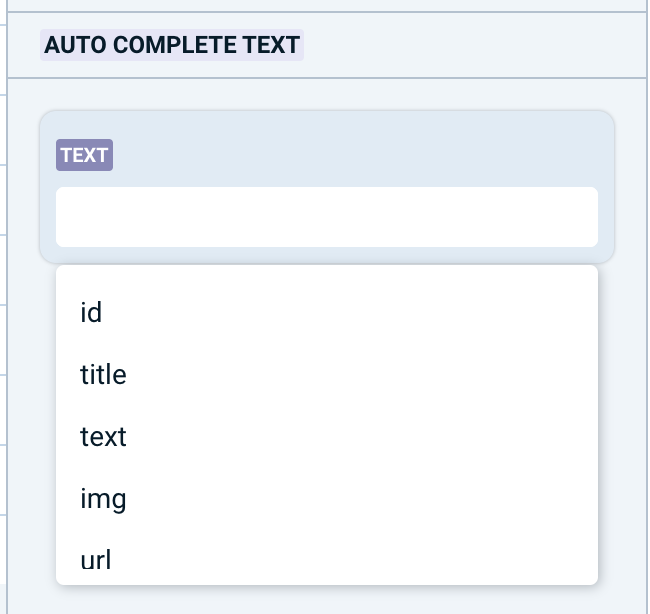 Auto Complete Text: Continues and finishes text using AI. Auto Complete Text: Continues and finishes text using AI. |
 |
 Semantic Search: Searches with contextual meaning across large bodies of text. Semantic Search: Searches with contextual meaning across large bodies of text. |
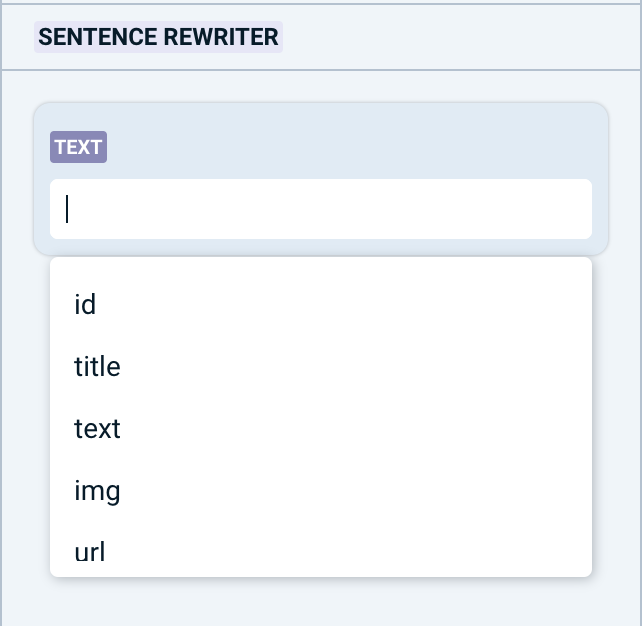 Sentence Rewriter: Rewrites and paraphrases text using AI. Adjust higher for greater variability. Sentence Rewriter: Rewrites and paraphrases text using AI. Adjust higher for greater variability. |
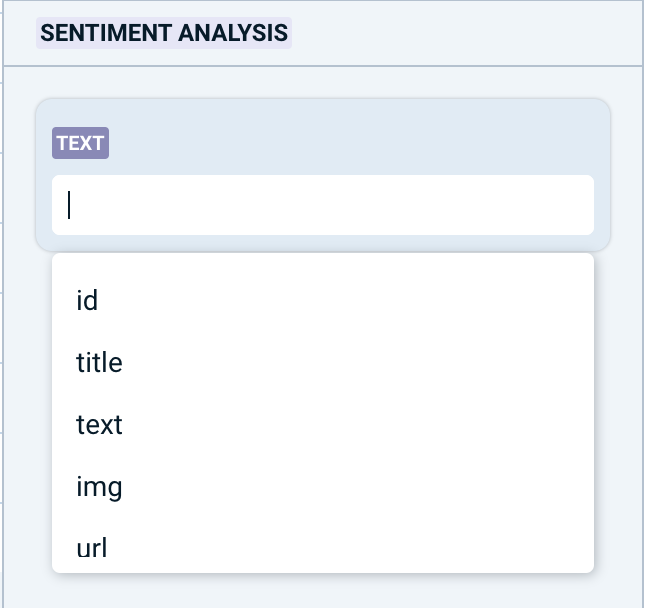 Sentiment Analysis: Identifies the affective state or emotion of text using AI. Text is sorted based on how likely it is to be positive, negative, or neutral. Sentiment Analysis: Identifies the affective state or emotion of text using AI. Text is sorted based on how likely it is to be positive, negative, or neutral. |
|
|

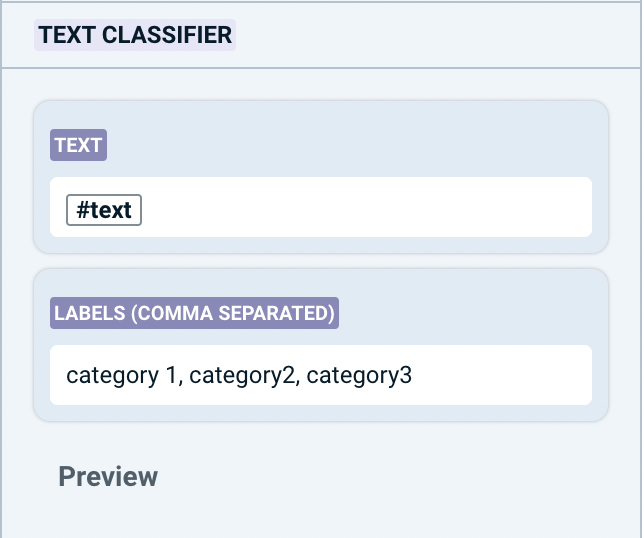 Text Classifier: Categorizes text using AI. Text is sorted based on how likely it belongs to a given category. Introduce categories manually and separate them with a comma. Text Classifier: Categorizes text using AI. Text is sorted based on how likely it belongs to a given category. Introduce categories manually and separate them with a comma. |
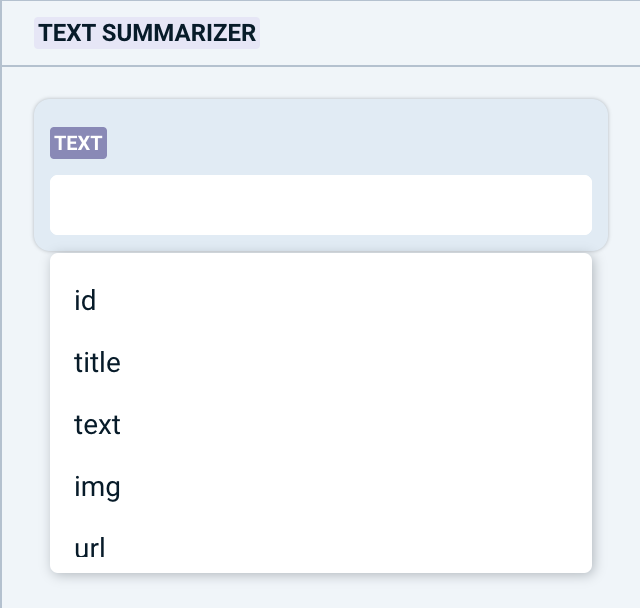 Text Summarizer: Condenses text while preserving important information using AI. Text Summarizer: Condenses text while preserving important information using AI. |
How to Write Effective Prompts
This section covers the basics of writing prompts for language models.
Language Model Basics
To make a good prompt, it’s necessary to understand how they work.
The idea behind this type of system is that words are not chosen by thinking about them logically, but rather by probability.
The AI has a massive database from which words are recognized by patterns, grammar, and semantics. This gives the AI the ability to set different levels of probability for certain words depending on the instructions given in the prompt.
For example, imagine that you provide the AI with the prompt “Give me a list of top pizzerias in New York.” The AI will assign high probability to everything related to “New York,” “pizzeria,” and “top,” and as such, it will be drawn toward places stored in its database complying with those categories. For readability, coherent grammar (e.g. prepositions, articles of speech), get assigned a high probability for use between those key pizza places to construct a full sentence. The AI selects the word that makes the most sense linguistically (i.e. the word that has the highest likelihood of being next in the sentence) to make the sentence.
Additionally, if you tell the AI to format the results with a particular style (like a bulleted list) it will render its grammar accordingly.
Important: The AI’s database consists of what you have in your included in your data set (if you include the column category in your prompt), and the direction that you provide in your prompt. Take this into account when creating your prompts since the AI might not remember everything you have told it in previous prompts.
The Approach
Of course AI can accomplish many tasks in very little time, but your job is to be creative and persist with it; let the models automate processes while you serve as Creative Director. Creativity is really the only thing missing for your partnership with AI to bloom and become better than the sum of its parts.
In many cases, prompts will be insufficiently worded and don’t yield the result you might want. You should always be thinking about how to get an even better prompt after the AI is done with the current one. What can you change? Can you provide more detail? Be more descriptive? If your prompt has failed, analyze it. In what ways did it do what was expected? In what ways did it deliver unbalanced results? Where is there room for improvement? This is best practice when it comes to reworking your prompts and getting the right output. With this mindset, you will master Narrativa® Navigator in no time!
How to Write Prompts
If you’ve read and understood everything up to this point, you might have also realized that the model is not deterministic. This means it doesn’t necessarily do everything it is told to do, but rather, is probabilistic; it does in fact try to do everything told to the best of its ability.
To make sure it does follow its instructions as you wish to see them carried out, you will need to be as clear, direct, and meticulously detailed as possible. This will simply assign greater probabilities to the words and structures needed to generate quality content.
Functions
Various types of mathematical, logical and formatting functions are available and can be highly useful. Here is a detailed list of the available functions:
Mathematical
ABS: Calculates the absolute value. Upon selecting this function, a field will appear with a pop-up list, allowing you to choose the numerical column from which the value should be chosen.
DIFF: Subtracts values. To perform this calculation, you have the flexibility to choose the specific elements that will be subtracted and those from which they will be subtracted. This can be done by either selecting the desired columns in the respective fields or directly typing in the values.
Additionally, if you require more subtractors, you have the option to add them by clicking on the “Add field” button. This allows you to include additional elements in the calculation, further expanding the flexibility of the DIFF function. You may delete any manually added fields by clicking the “X” inside the field box.
DIV: Divides values. Similar to the previous functions, the numbers are obtained from the columns you select. By clicking on the provided field, a pop-up list will appear, allowing you to choose the desired columns.
EXP: Calculates the raising of a base value to the power of x. As with the previous functions, you need to select the base number and the exponent from the pop-up list by clicking on the respective field.
MAX: Returns the maximum value among two or more values. You can select the columns by clicking on the provided fields, and if necessary, you can add more columns.
MEAN: Calculates the mean (average) of two or more values. By selecting the appropriate columns, you can calculate the mean. Additional columns can be included if required.
MIN: Returns the minimum value among two or more values. Similar to the previous functions, you need to select the desired columns, and you can add more columns if necessary.
MODE: Returns the most frequent value.
PROD: Multiplies values. By selecting the factors from the pop-up lists that appear upon clicking on each field, you can multiply them together. Additional factors can be introduced as well.
RANGE: Calculates the difference between the largest and smallest values.
ROUND: Rounds a value to a specified number of decimal places. The first box is used to input the number to be rounded up (you can select a column), and the second box determines the number of decimal places (again, a column can be selected).
SQRT: Calculates the square root. By clicking on the respective column from the provided list, you can select the number you want to use in calculating the square root.
SUM: Adds values. By clicking on the input field, you can select the values to add together. If necessary, you can also add more values.
SUM DAYS TO DATE: Adds date values. This function is the same as the SUM function, but it only deals with adding days together. Click on the provided input field and choose from only those columns classified as dates (the appropriate format should follow any date form).
Text Formatting
COPY: Returns a duplicate.
CONCAT: Combines text together (with a separator in the middle). By clicking on the provided fields, you can select the two columns to be concatenated. Additionally, you need to specify the separator by typing it or selecting an additional column.
DELETE: Removes all occurrences of a substring of text
LEFT: Returns a substring of text starting from the left. To utilize this function, you need to select the target text in the first field and then specify the number of characters in the second field. This function is the opposite of the RIGHT function.
LEN: Returns a character count. (This includes spaces, commas, dots, etc.)
REPLACE: Substitutes original text with new text. This function consists of three input fields: the first input field is for the target text, the second input field is for the old text to be replaced, and the third input field is for the new text to be introduced. You can also manually write the text or select columns.
RIGHT: Returns a substring of text starting from the right. This function is the opposite of the LEFT function.
TRIM: Removes leading, trailing, and repeated spaces from text. It eliminates any additional spaces in a text string, ensuring proper formatting. You can input the text to be corrected in the available input field.
Tip: AI Agent Recipes display output typology. This lets you quickly understand the type of information contained within.
Projects
Once you’ve manipulated your data using AI Agent Recipes, you can move on to create a template to finalize your automation of your content. To create such templates, navigate to the Projects page.
Important: Templates are specific to each Project and can’t be replicated automatically. Duplications of templates must be manually created.
Project Creation
When creating a Project, you have the flexibility to choose the desired structure of the output. For instance, you may want to utilize the output of an AI Agent in a tweet, or you may wish to create a blog post that incorporates data from data sets as well as data generated using AI Agent Recipes.
To initiate the Project creation process, click on the plus sign located at the top right corner of the screen. Subsequently, you will be prompted to select an AI Agent with which to work. Upon making your selection, you will be directed to the screen below.

To proceed with the Project, there are a few key steps to follow. First, you will need to assign a name and add a description to the Project.
Important: Although the description field is optional, providing one can offer the AI additional context and thus, outcomes may be more in line with your expectations.
Additionally, you will be asked to select a language and region for the Project. This choice determines the linguistic and regional parameters that will influence the Project’s execution. It ensures that the Project aligns with the specific language nuances, optimizing its accuracy and relevance.
Lastly, you will be prompted to choose an output template. This template specifies the desired structure for the Project’s output.
Once the Project is created, a Project card will appear in the Projects section.
![]()
Templates
Templates serve as pre-designed frameworks or structures that provide a starting point for your Project.

Each of these templates serves a specific purpose by offering a pre-selected set of content blocks.
Content Blocks
Content Blocks are structured and ordered components that define the content layout based on the chosen template.
Let’s take a Facebook template as an example. On Facebook, a post consists of several content blocks, including the text block (which contains the content of the post), the URL block (used for adding a link), and metadata content blocks.
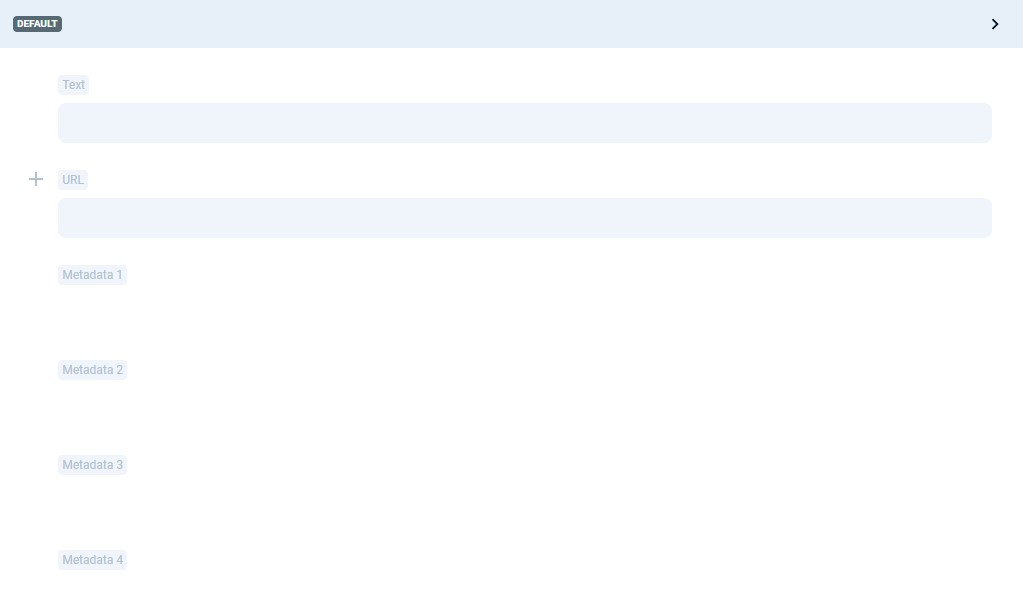
Adding new content blocks is as simple as clicking on the plus icon located next to the content block name.
 To delete a content block, navigate to the specific block you wish to remove and click on the trash icon. Please remember that each section must have at least one content block.

Modifying the position of segments within a content block is effortless. You can drag and drop the segments to the desired positions.
To edit the segments within a content block, simply click on the content block itself. This will allow you to make the necessary modifications to the content.
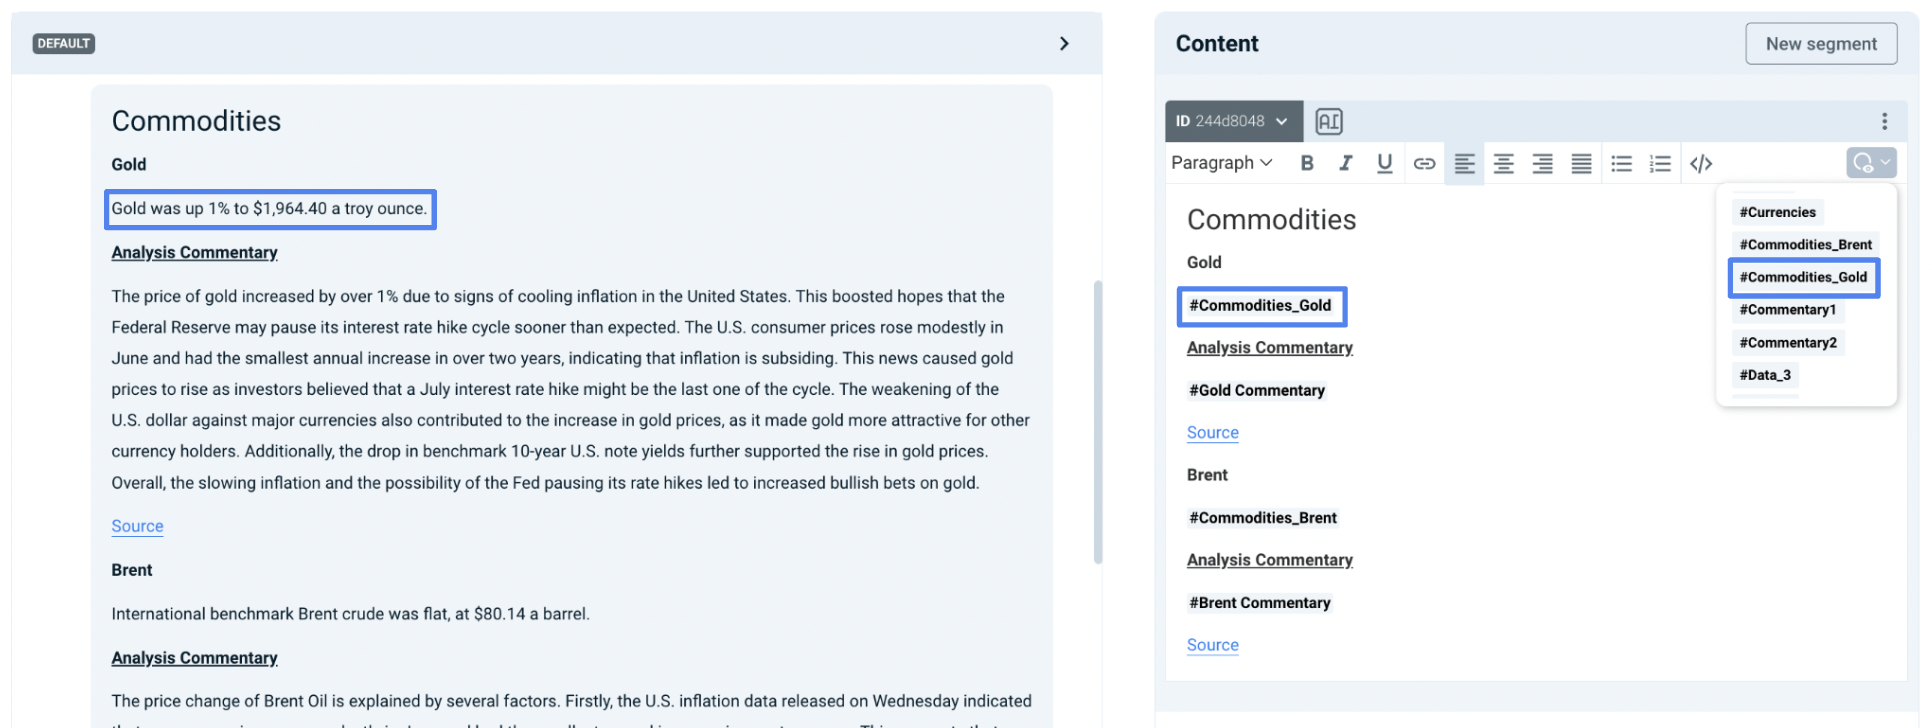
Segments
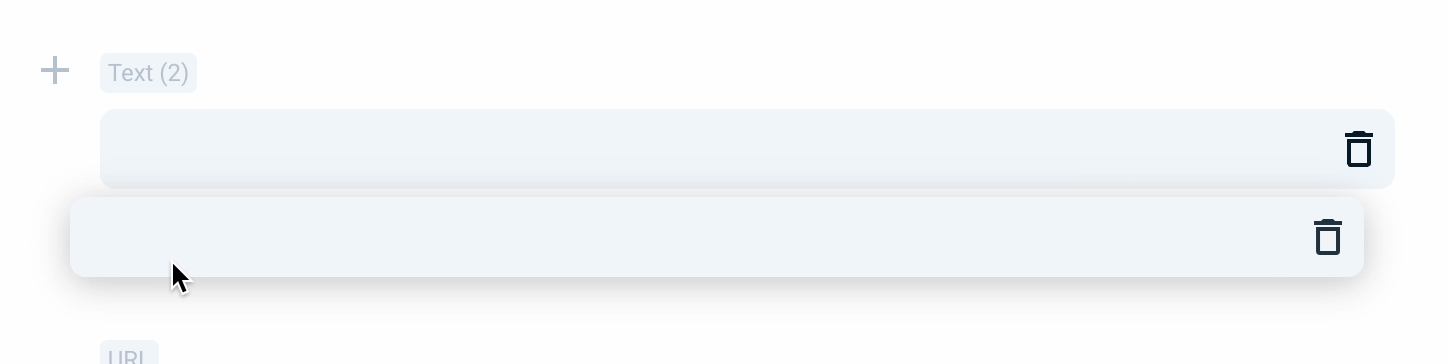
A content block must have at least one segment, but you have the flexibility to create as many segments as you desire. When a content block contains multiple segments, the platform evaluates the validity of each segment and randomly selects one among the valid segments to ensure variability in the generated content narratives. If a data point is empty and it is NOT mandatory however, then the content block in which it is used it is not displayed in the narrative.
Important: There are two segment types—one that accepts plain text and the other that accepts the formatting of rich text and HTML.
Invalid Segments
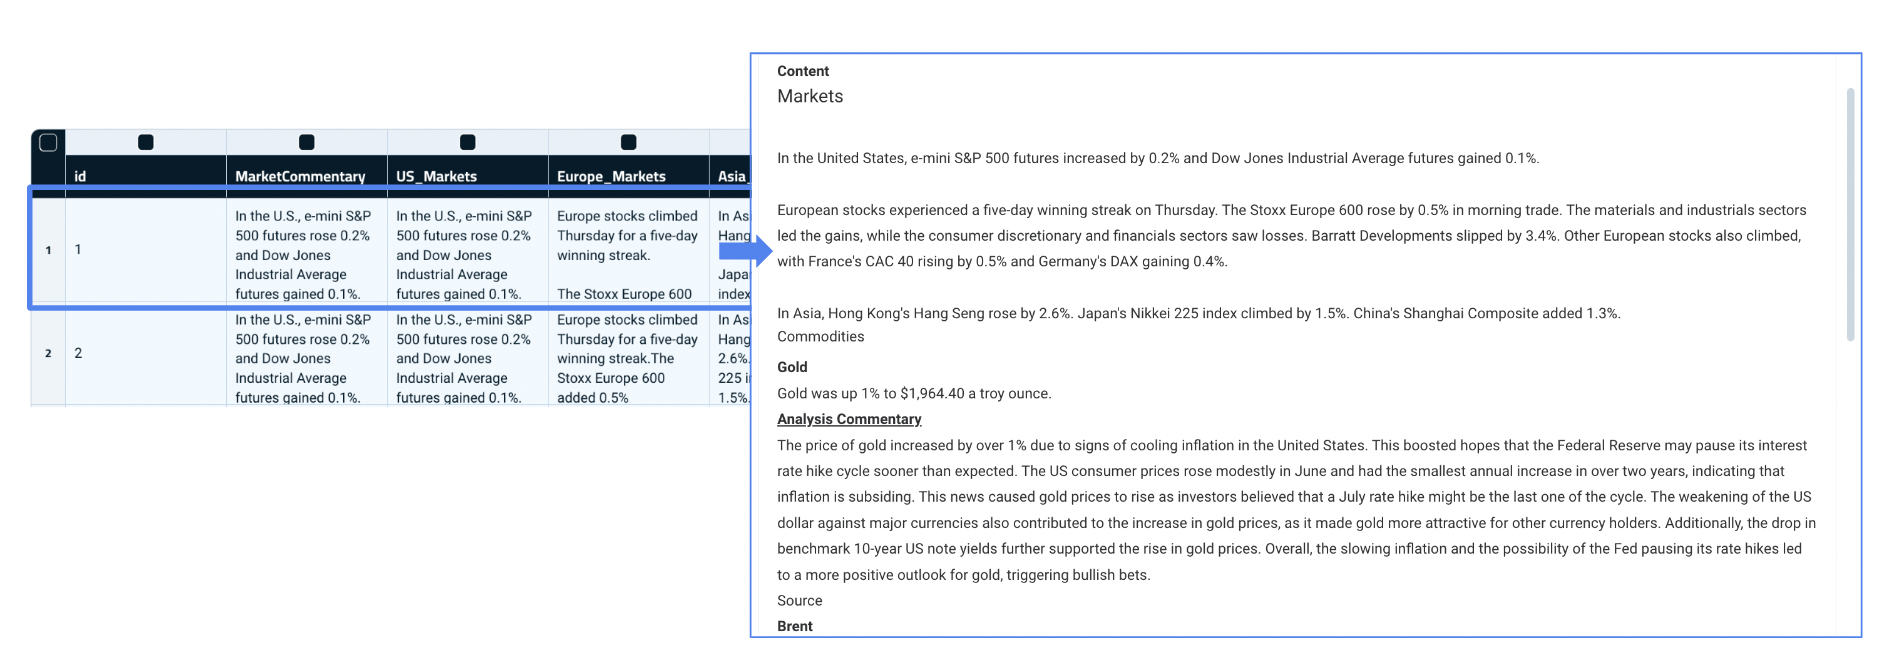
Invalid segments occur when the data used within a segment is invalid. For instance, consider the following segment:
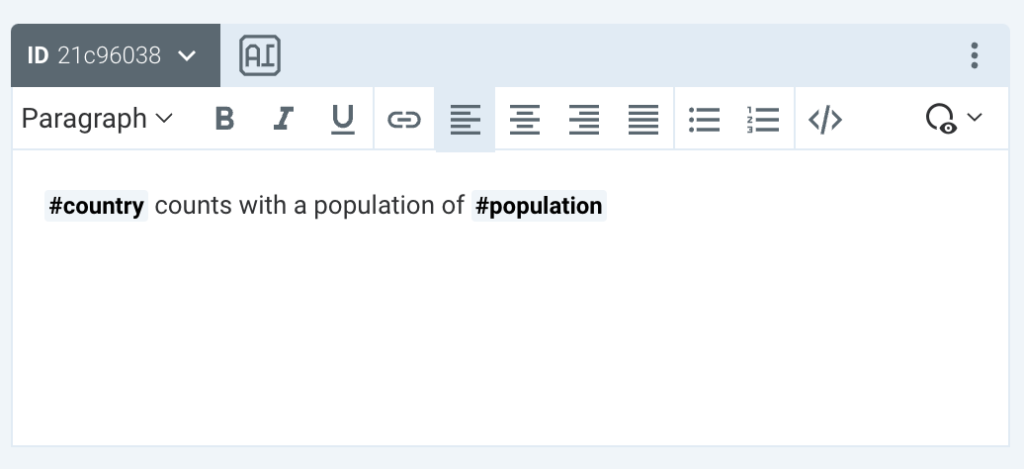
In this scenario, if the “#population” data is not set as mandatory in the dataset, it is possible to upload a dataset where the #population field is empty. Consequently, the segment may be considered invalid as it attempts to utilize an empty value. This occurs because the necessary data required to render the segment’s output, specifically the “#population” data, is not available.
Segment Editing
Editing the segment is simple. Write and format the desired text within the segment, crafting it to how you like it, then integrate data and AI Agent Recipes within the segment to enhance the content.
Adding Data and AI Agent Recipes Data
To add data to a segment, position the cursor at the desired location within the segment. Next, click on the data icon. A dropdown menu containing available data options will appear. From the dropdown menu, select the desired data that you want to include in the segment.
Clone Segment and Paraphrasing
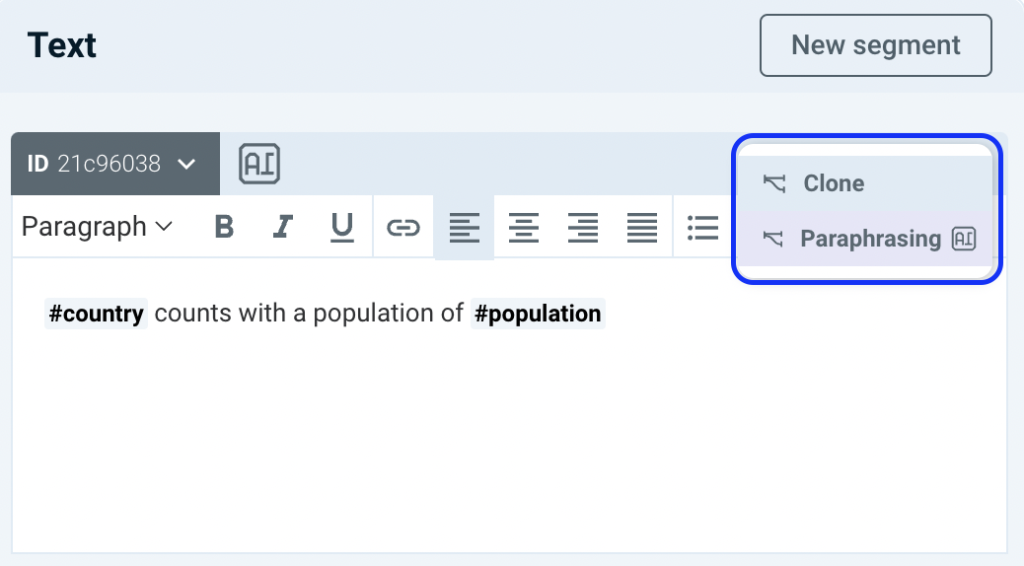
To clone a segment, simply click the clone button, and an exact copy of it will be generated.
If you wish to create a new version of the segment with different wording, you can utilize the AI Paraphrasing feature. Clicking the AI Paraphrasing button will initiate the AI Paraphrasing model, which will use the original segment as a foundation to generate a paraphrased version of it. This allows you to quickly generate alternative versions of the segment, providing more diversity within the content.
Add a New Segment

To add a new segment, click on the “New Segment” button. This action will instantly create an empty segment. Alternatively, you click “Gen AI” to automatically author a segment with context using AI.
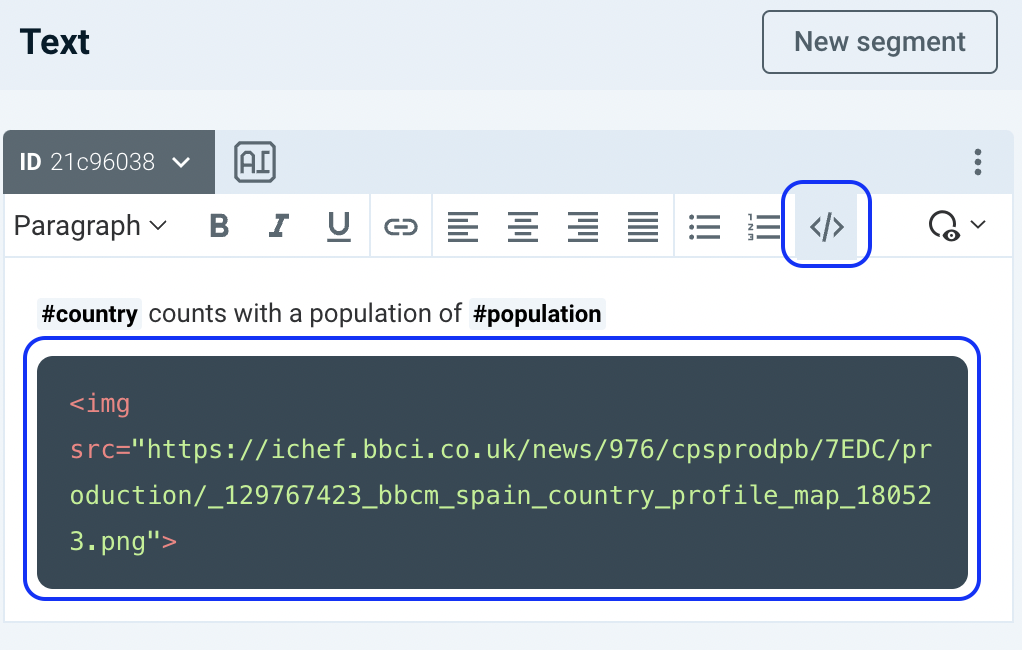
Add Code
This option provides you with the ability to add or write HTML and Javascript code. Thus, you can incorporate custom HTML elements, styles, and interactive functionalities within your content.
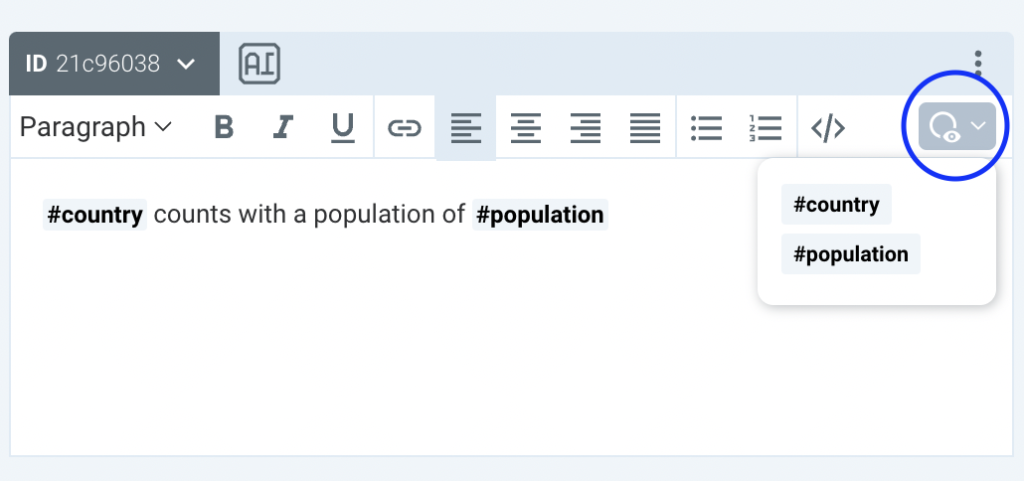
Segment as an agentic AI Prompt
By converting the segment into an agentic AI Prompt through the AI button, the text becomes input for an agentic AI model. Instead of being displayed as regular text, the model interprets the prompt and renders an output based on it.
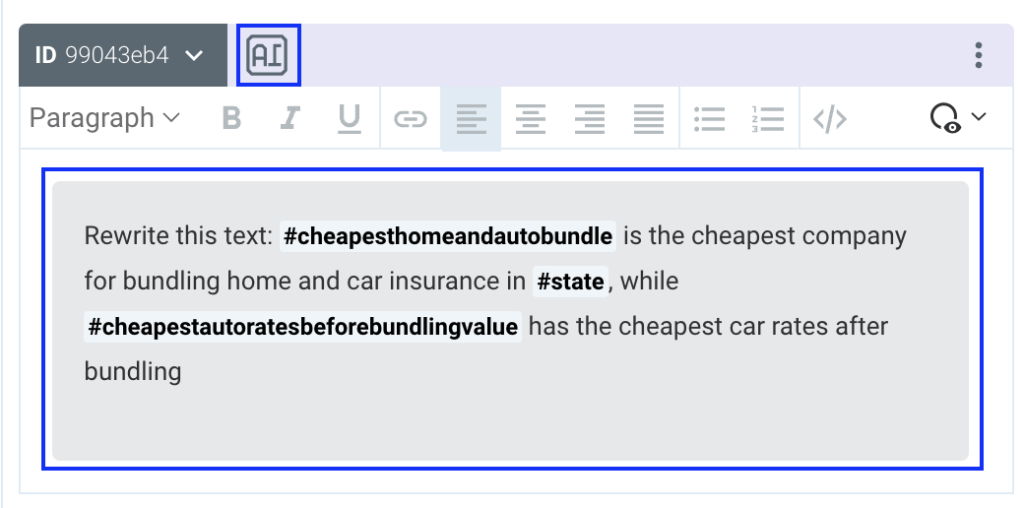
This functionality offers great versatility and usefulness in various scenarios. For instance, it can be particularly beneficial when aiming to enhance the readability of a segment that contains repetitive data.
Consider the following segment with readability issues:

However, by transforming the segment into an AI Prompt and providing simple direction in the form of a prompt, you can significantly improve the sentence’s readability.
Here is the improved output of the segment:

Synonyms
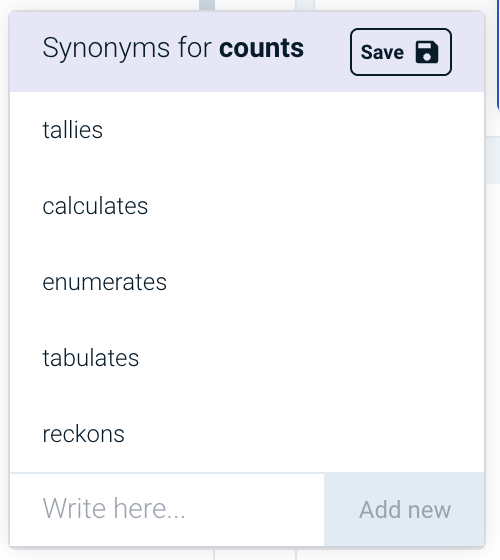
To introduce more variability to segments, you can incorporate valid synonyms for words. This can be done manually or with the assistance of the platform’s AI capabilities.
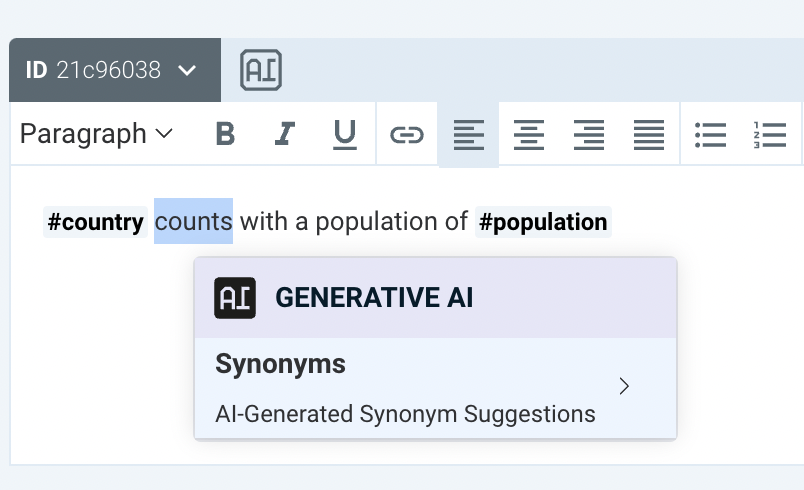
To add synonyms, select a word and right-click on it. From the menu that appears, choose the “AI Synonyms” option. The AI model will then suggest five alternative synonyms for the selected word. You have the option to accept the suggested synonyms or delete them. Additionally, you can write in your own synonyms if desired.
After adding synonyms to a word, you will notice that an icon with the letter “S” appears next to the word. This icon signifies that synonyms have been associated with the word.

Data Formatting
You can format the the following data types added to the segment:
- Date, time and datetime
- Number
- Text
To add formatting, click on the data point and a “TT” icon will populate. Click it again and the formatting menu will appear.
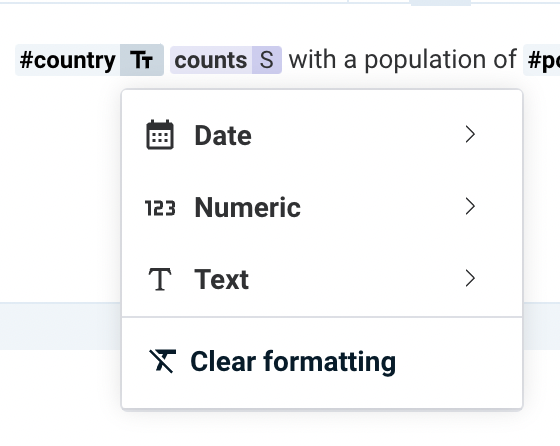
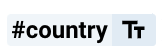
Once a formatting style has been applied to a data element, you will observe the “TT” icon next to that particular data point. This “TT” icon serves as a visual indication that a formatting style has been assigned to the data.
Date Formatting
You can apply the date format to specific data points if their data type is either date, datetime, or time. This format option allows you to customize the display of dates and times according to your language and regional properties of the Project.
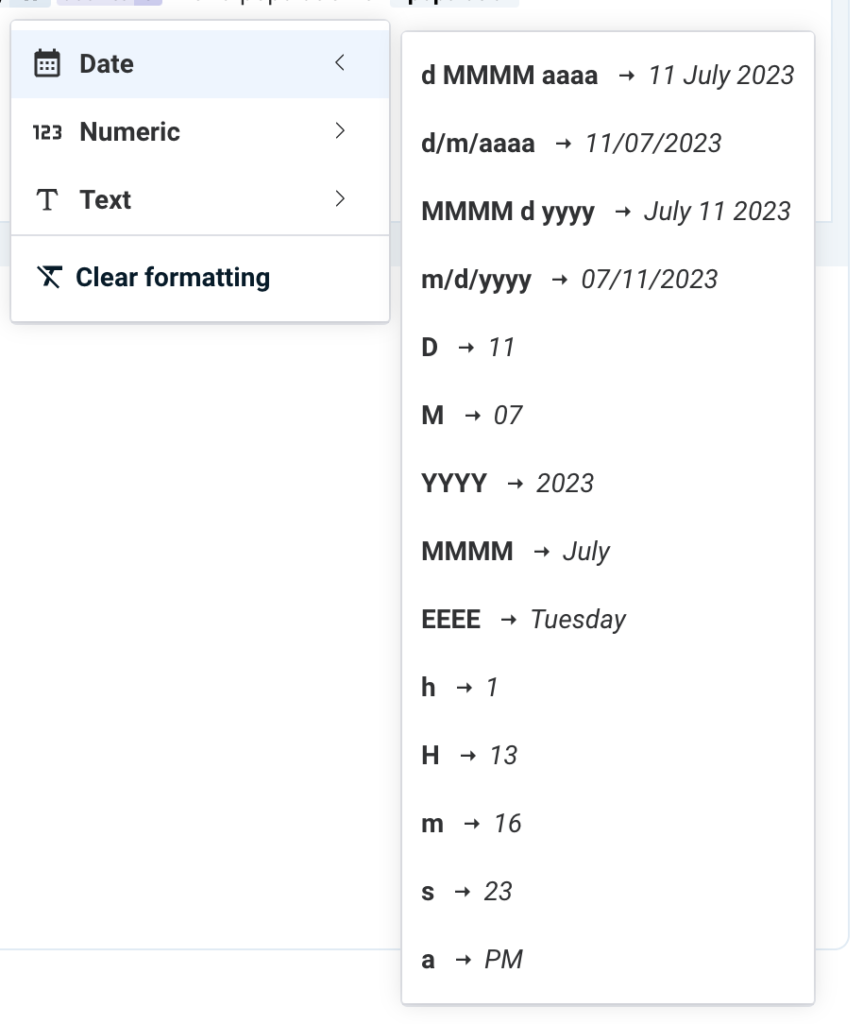
Tip: Here are some things to remember when formatting the time:
- Use “h” to denote the 12-hour format for time representation.
- Use the uppercase “H” to denote the 24-hour format for time representation.
- To add AM or PM to the time, include “a” in the format.
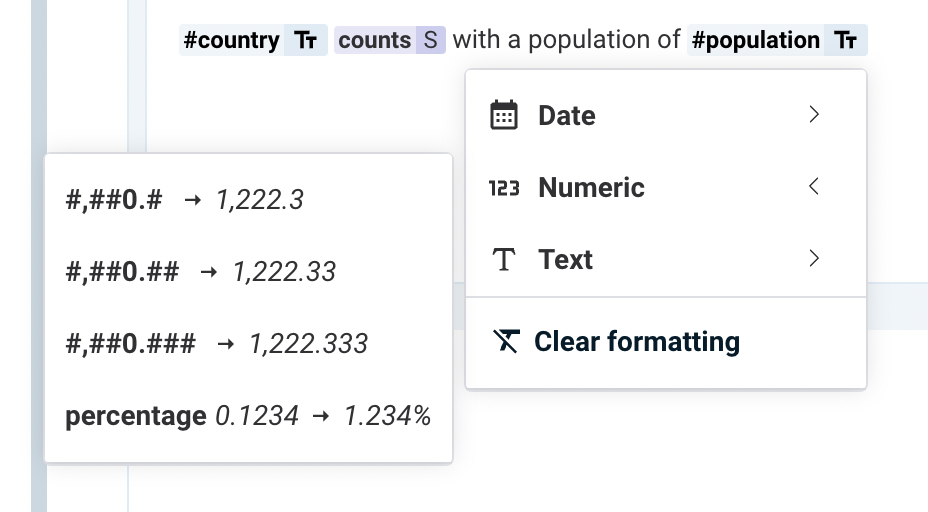
Number Formatting
If the data type of a specific data point is a number, you will have the option to apply number formatting.
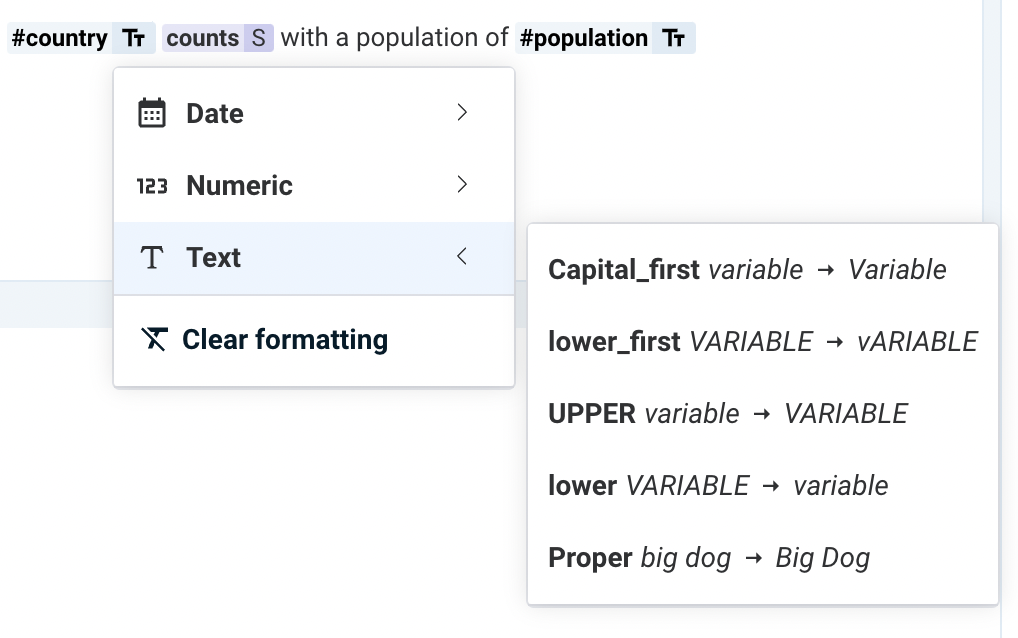
Text Formatting
When the data type of a specific data point is a string of text, you can utilize the text formatting option.
How to Remove Formatting
To remove formatting from a specific string of text, simply click on the “TT” icon located next to the formatted text. A dropdown menu will appear, providing various options. From the dropdown menu, select the “Clear Formatting” option. This action will remove all the applied formatting styles.
![]()
Important: The preview of a narrative will still be generated even if there are mandatory data missing. Final narratives will not be generated when mandatory data are missing and an error message will populate, however.
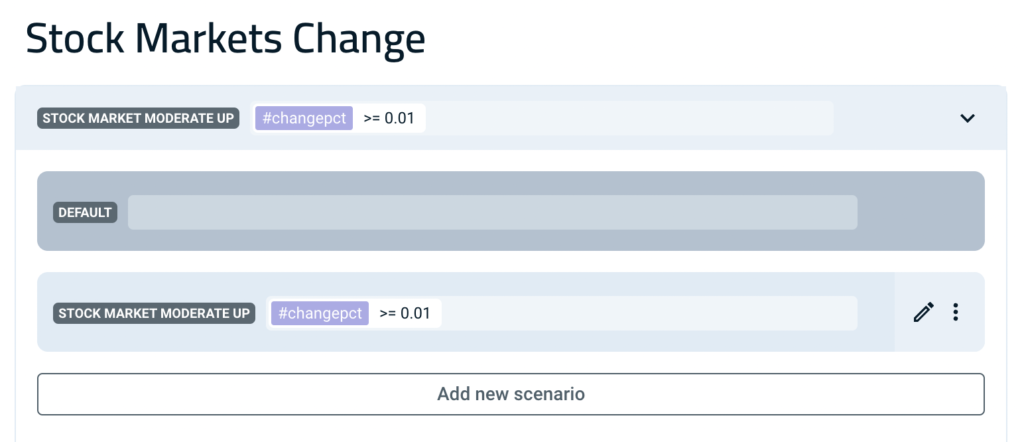
Scenarios
Scenarios refer to the different contexts in which the content is intended to be used or applied. They represent specific circumstances where the content is expected to fulfill a particular purpose or meet specific user needs.
There is a scenario known as the “DEFAULT” scenario, which lacks a specific context. However, you have the flexibility to create multiple scenarios and introduce several layers of explicit contexts.
Important: The “DEFAULT” scenario serves as a fallback option, meaning that if the conditions of any other scenario are not met, the system will automatically trigger the “DEFAULT” scenario. It acts as a safety net, ensuring that there is always a scenario available to handle situations where the defined conditions for other scenarios may not be satisfied.
Context is established by leveraging the data available in the data set and AI Agent Recipes. For instance, let’s consider a scenario involving content related to stock markets. In this case, you may create a scenario where you define specific conditions for the day-to-day change in the NASDAQ Composite Index. You can set rules stating that a change should be greater than a certain value, lower than a specific value, or fall within a specified range of values to trigger the text contained within the segments of a scenario to populate.
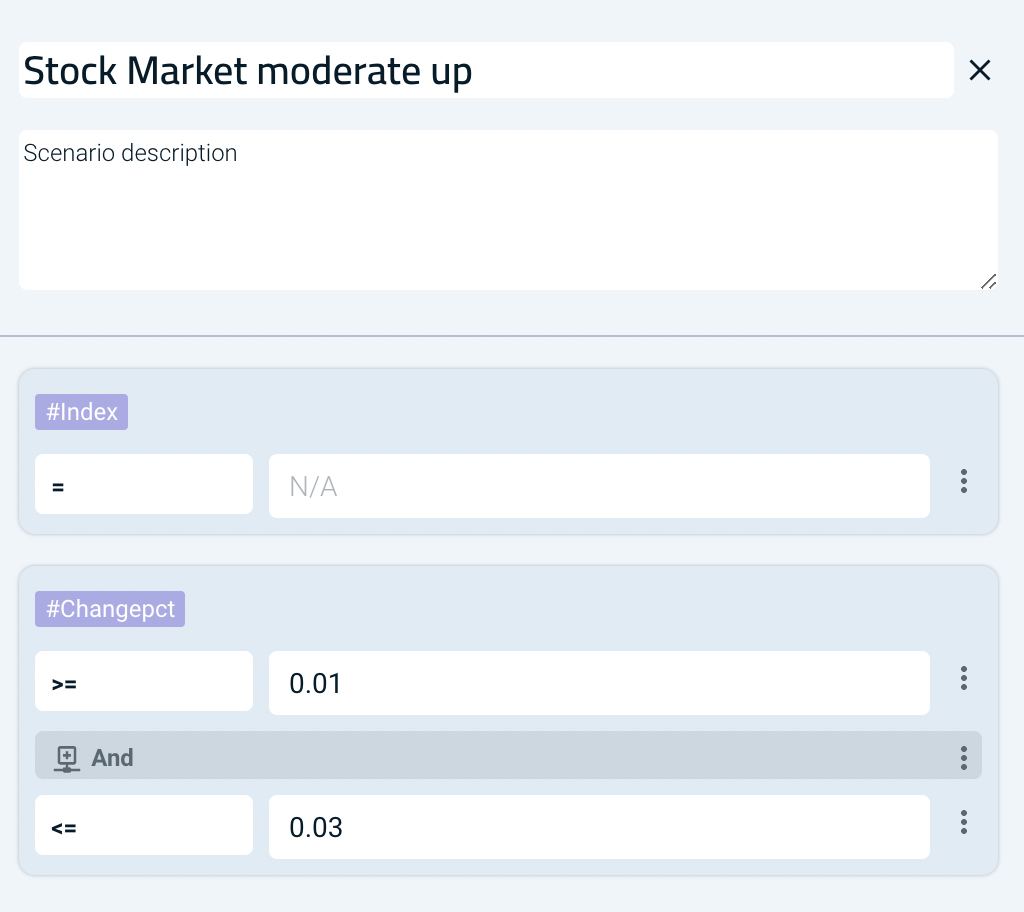
To switch between different scenarios, you can navigate to the dropdown menu by clicking on the arrow symbol. From there, you can select the desired scenario on which you wish to work. This functionality allows you to easily transition and access different scenarios within the system, enabling you to focus on specific contexts for content creation.
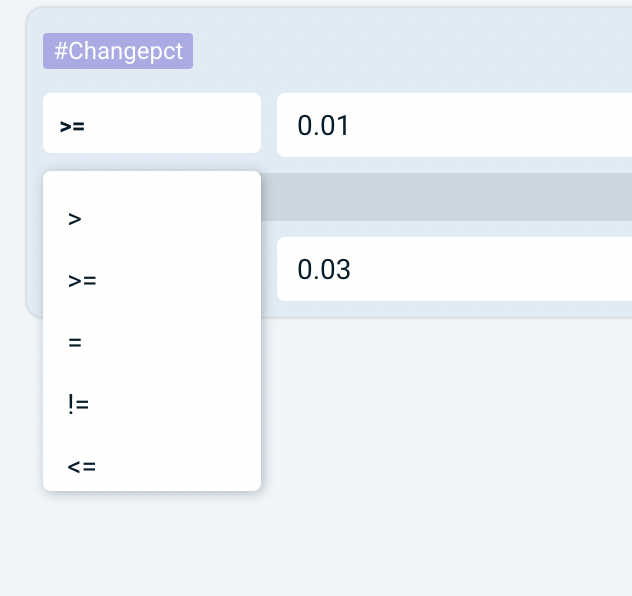
To define the trigger rules for scenarios, you can utilize the following comparison operators:
- = Represents equality, where the value is equal to the specified condition.
- < Indicates a comparison where the value is less than the given condition.
- > Signifies a comparison where the value is greater than the provided condition.
- <= Denotes a comparison where the value is less than or equal to the specified condition.
- >= Represents a comparison where the value is greater than or equal to the given condition.
- != Represents inequality, where the value is not equal to the specified condition.
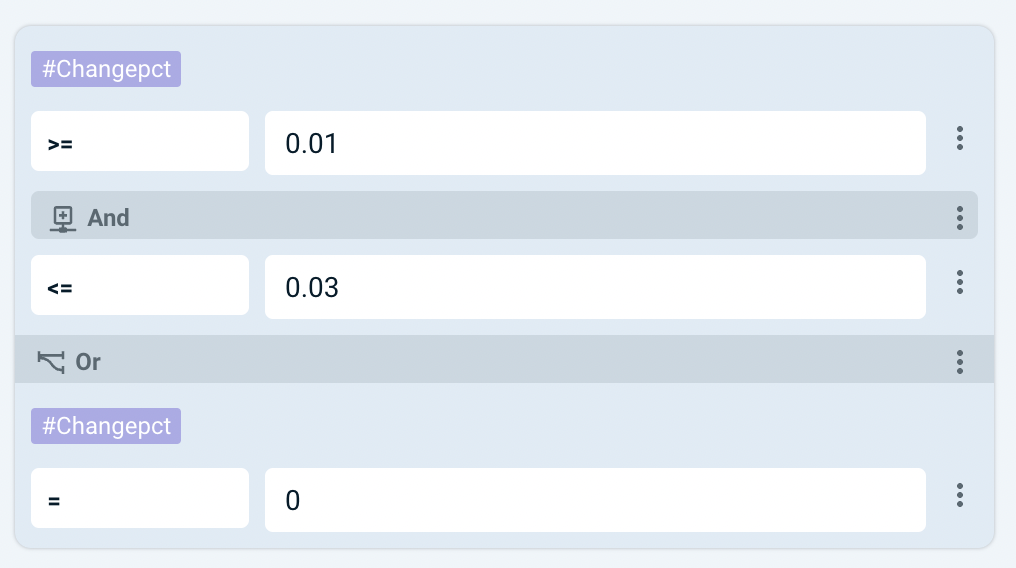
Furthermore, you have the ability to construct complex scenarios by utilizing the AND and OR operators to combine multiple scenario rules.
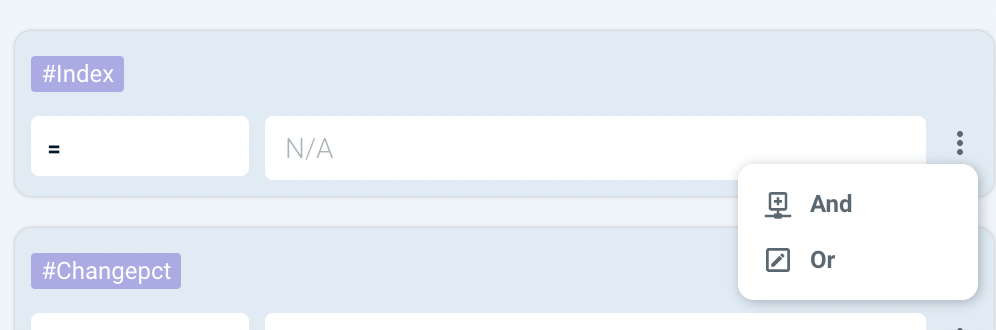
AND: This operator allows you to create a scenario rule that requires all specified conditions to be met simultaneously.
OR: On the other hand, the OR operator enables you to define a scenario rule where any one of the specified conditions can be met for the scenario to be triggered.
It is also possible to combine the AND and OR operators to create exceptionally intricate scenarios.
Send to Production
Turn the status of your project to on.

Subsequently, click the disk icon located at the top of the Project screen to activate the automation workflow.

From here, the platform will perform the following tasks:
- Create a new dedicated content repository in the CMS specifically for the Project;
- Generate content narratives for all valid rows present in the data set associated with the Project.
Important: Note that once the automation workflow is activated, any new data row that appears in the data set used by the Project will automatically trigger the generation of a narrative in the CMS. The green check mark and red X indicators will inform you which narratives were created and which contain errors. Click on an error to navigate to the specific narrative.

Directories
To improve the organization of your work in the platform, whether in Data Sources, AI Agent Recipes, or Projects, you have the option to create directories. Directories help you organize your content into categories to achieve a cleaner, easier-to-navigate, and more manageable workspace.
Directories also support hierarchies; you can create subdirectories within an existing directory.
How to Add a Directory
- Select the “Add” option located at the top right of the screen.
- Choose the “Directory” option.
- Assign a name to the new directory, and it will be added to your user account.
From then on, any item you create within that directory will automatically be added to that location. To move existing items to a newly created directory, click on the kebab menu icon (i.e. the three vertical dots) and choose the “Move” option. Then, specify the target directory for the item, and it will be relocated accordingly.
CMS
The Content Management System, (or CMS for short), ensures that the content generated by the automation workflow is stored in organized fashion.
The CMS makes it convenient to manage and retrieve your narratives. Users may also make manual edits to and publish the content into the Feed URL or end point as needed.

You can complete the following actions in the content repository for each Project:
|
Narrative, Edit and Code: The Narrative tab displays generated narrative. The Edit tab provides the ability to modify and make changes to the content of the narrative. The Code tab allows you to access and examine the underlying structure of the endpoint node that contains the specific narrative.
|

|
Publish/Unpublish: The Publish/Unpublish function enables you to control the publication status of individual narratives to the Feed URL or endpoint. By default the narratives generated in the CMS are not published in the URL Feed or endpoint. The publish button allows you to publish manually one by one the content narratives generated, in case you want all the narratives to be published automatically in the Feed then you need to select the switch the auto publish option to on.
Additional Settings Dropdown: For each narrative, you can click on the kebab menu icon to view more settings. “Generate a new version” produces another variation of the content. “Locate in Project” navigates you to the Project where the content originated. “Delete narrative” allows you to remove a narrative from the content repository entirely. This action permanently deletes the narrative and removes it from the platform, making it inaccessible.
You may also publish, unpublish, or delete multiple narratives simultaneously. First check the box for the narratives you wish to modify and then click the bulk action button to make your selection. |


|
Add Empty Narrative: The “Add empty narrative” button will create a blank narrative within the content repository. Use this when you want to add customized or manually written narratives that are not generated through the automation workflow.
|
|
Auto Publish: The Auto Publish function enables automatic publishing of newly generated content narratives from the content repository to the designated “feed URL”. This means that once activated, all the new content narratives will be distributed without manual intervention.
|

|
Unsubscribe: If you are currently subscribed to content, the button will be green and read “Subscribed,” just like it does below. By clicking this button, you will then unsubscribe to the content and disassociate the container in content library from the Project. Once unsubscribed from the content repository, no further narratives will be generated for that particular Project.
Regenerating a Narrative: To regenerate a narrative that has already been created, click on the “Generate a new version” button, but note that the original narrative will not be deleted automatically. |

Feed URL or Endpoint
Each newly created content repository is automatically assigned a corresponding Feed URL or API endpoint. This endpoint serves the content in either XML or JSON format, making it effortless to integrate with another CMS or application. This integration capability facilitates seamless communication and data exchange between the content repository and external systems.
How to Integrate the Endpoint Feed
Every content narrative is assigned a unique ID that serves as its identifier within the system. Each narrative contains additional metadata too, such as the date it was generated and information about the author or creator. These metadata elements provide valuable contextual information about the narrative and enables easier organization, tracking, and reference within the content repository.

Important: Note that the content narratives generated will only remain accessible in the feed for 24 hours from the time of publishing. After that period, they will no longer be regularly accessible.
If you need to access content narratives that are no longer present in the endpoint, you can utilize one of the following URL parameters:
Use the URL https://content.gabriele.ai/narratives/api/content/TOKEN?latest_num=100 to retrieve the latest 100 posts regardless of their publishing time.
Use the URL https://content.gabriele.ai/narratives/api/content/TOKEN?from=2022-12-31 to retrieve posts published after a specific date.
Use the URL https://content.gabriele.ai/narratives/api/content/TOKEN?since_mins=60 to retrieve posts published within the last 60 minutes.
Use the URL https://content.gabriele.ai/narratives/api/content/TOKEN?from=2022-12-01&to=2022-12-31 to retrieve posts published between two specific dates.
Important: Note that these methods are intended for development mode only and should not be used in production.
Good to know…
If you are using WordPress as your CMS, see the following article for instructions on connecting the Narrativa endpoint:
Frequently Asked Questions (FAQ) About Feed Integration
What is the recommended delay between each feed check?
Most clients find that a delay of 5-10 minutes is sufficient.
The feed is in XML, can I get a JSON version?
Yes, you can obtain a JSON version by adding a header titled “Accept” with the content “application/json”.
Can I directly use the image URLs from the feed on my website?
No, the image URLs provided in the feed are not intended for public use. They are meant for downloading the content as well as image contents.
What are the “_rev” and “_id” fields for?
The “_rev” and “_id” fields pertain to the internal versioning of each document and are not intended for consumer use.
Suggested Flow Diagram
Here is a suggested flow diagram illustrating how to use the news feed from Narrativa.
